
Introduction
In the previous post I introduced PostgreSQL sequences, tables, and columns; and we used the Lesson_002 files in the learning-data-science GitHub repository to create a table for storing metadata about scientific studies. In this post, Lesson 003, we’ll insert data into the dom_study table that we created in the previous post. Since data analysis and management are best learned by doing, the objective of this and future posts is to get readers hands on experience using PostgreSQL and R. This lesson builds on earlier posts so, if this is your first time reading this blog and you’d like to follow along on your computer, then please go back and start from the post Learning Data Science and work through the lessons up to this point.
For this post we’ll be using the files in the Lesson_003 folder in the learning-data-science repository. If you have not already forked the learning-data-science repository, and cloned the fork to your computer, please do so now following the instructions provided in the post Learning Data Science. If you have previously forked and cloned the repository, but don’t have the files for this lesson, then follow the instructions here to update your fork with the latest files.
If you are not familiar with version control using Git and GitHub, I recommend going back and working through the hands on tutorials in my series on version control starting with “Version Control: An Overview.”
Inserting Data into a Table
Insert Script
In the previous post we created the dom_study table in the domains schema for storing metadata about scientific studies. At the conclusion of the previous post the dom_study table was empty, i.e., the table contained no data. Data can be entered into PostgreSQL tables using several different methods, including manual entry, importing from a CSV file, or using a SQL insert script. Here we’ll enter a row of data into the dom_study table using an insert script.

First, open pgAdmin, connect to my_first_database, and open a Query Tool window. Next, follow the instructions below to insert the data:
- Click on the Open File tool and navigate to the clone of your fork of the learning-data-science repository.
- Open the 01_insert_into_dom_study_arcn_lc.sql file under Lessons/Lesson_003. The sql file will open in the query tool (Figure 1).
- Click the Execute button (Figure 1, blue arrow) to run the script. In the Data Output Pane at the bottom of the Query tool window you will see a preview of what the inserted data will look like (Figure 1, green arrow).
- Next, click on the “Commit” button (Figure 1, red arrow) to commit (i.e., save) the changes to the database (more on this in a bit). You should see a message at the bottom of the Query Tool window that says something similar to “COMMIT Query returned successfully in 106 msec.”
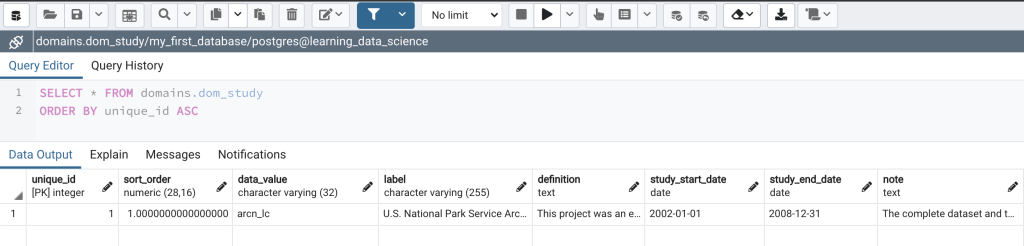
- Lastly, right click on the dom_study table, then click on View/Edit Data, and then on All Rows. The dom_study table will open and you should see the row of data that was just inserted (Figure 2).
An In Depth Review of Insert Scripts
Let’s now take an in depth look at the insert script to see how it works. I annotated the 01_insert_into_dom_study_arcn_lc.sql script with commented out notes that describe what each part of the script is doing. If you haven’t read the notes already, then please pause reading briefly, and review the notes in the script. On line 1 the BEGIN statement is used to initiate a transaction block (i.e., a series of statements separated by semicolons), and all statements below this line will be run until a COMMIT (save to the database) or ROLLBACK (abort the transaction) statement if provided. If you don’t start your transaction block with BEGIN, then you won’t have the option to rollback. For this reason I recommend always starting your scripts with BEGIN.
If you don’t start your transaction block with BEGIN, then you won’t have the option to rollback. For this reason I recommend always starting your scripts with BEGIN.
Line 3 is the start of the insert statement. Insert statements always start with “INSERT INTO” followed by the name of the table. Following that in parentheses is a comma separated list of the columns (lines 4-10) that you are planning on inserting data into. In this case I’ve added carriage returns after each column name to make the script easier to read, but it’s common for all columns to be listed on a single line. On line 12 is the start of the VALUES clause, which consists of one or more comma separated lists of data values that will be inserted. Each comma separated list represents a row in the table, is enclosed in parentheses, and is separated by subsequent comma separated lists of data values by a comma. In this case we’re only inserting a single row of data, so I’ve separated the data values with carriage returns after each to make the script easier to read. However, in most cases all data values for a row will be listed on a single line.
Pro Tip: If you’re writing a script that will make changes to the data, then I recommend always starting your SQL scripts with BEGIN and ending your scripts with RETURNING. Starting with BEGIN gives you the option to ROLLBACK (abort) a transaction. Ending with RETURNING allows you to see a preview of the changes before saving them to the database (COMMIT) or, in the event you see an error, aborting the transaction (ROLLBACK).
The values are listed in the same order as each data element’s respective column in the list of columns (lines 4-10). For instance, the data_value column is the second column in the list of columns, and ‘arcn_lc’ is the second value in the list of data values. Similarly, study_start_date is the 5th column, and the value ‘2002-01-01’, the date the study began, is the 5th value in the list of data values. Note that the columns in the INSERT INTO clause can be listed in what ever order you’d like, that is, they don’t have to match the order in which the columns are listed in the table. Just make sure that the data values in the VALUES clause match the order of their respective columns in the INSERT INTO clause. In the list of data values, values representing text, character varying, and date data types are surrounded by single quotes (e.g., ‘arcn_lc’), while numbers are included without quotes. Date values are included in ISO format, starting with the 4 digit year, then month, then day, and all separated by dashes (i.e., YYYY-MM-DD). Take note that we did not include the unique_id column in the insert, that’s because unique_id is a serial datatype, i.e., an auto-incrementing integer. Thus, when new rows are added, the unique_id column is automatically populated with the next number in the sequence.
Line 21 includes the RETURNING clause which provides you with a preview of the changes before they’re saved to the database. The asterisk following the word RETURNING tells PostgreSQL that you want to see all the rows in the table returned. However, if you’d like to see only certain columns returned, then you can provide the column names in a comma separated list in place of the asterisk. It’s always a good idea to include the RETURNING clause at the end of a SQL script. Be sure to review the results carefully before committing. Also, pay attention to the number of rows being inserted and ensure it matches with what you expect.
On lines 23-24 I’ve included the ROLLBACK and COMMIT statements, but have commented them out. This is to illustrate that either one of these would be the next step after the script is run and you’ve reviewed the preview provided by the RETURNING clause. ROLLBACK will abort the transaction, and COMMIT saves the changes to the database. ROLLBACK and COMMIT can be executed directly in the query tool, or using the respective button on the tool bar (Figure 2, red and green arrows).
Import Tool
Earlier in this post we used a SQL insert script to add a row of data into the dom_study table. Next we’ll try using the Import/Export Data Tool to import a row of data from a CSV file. However, first let’s execute the 01_insert_into_dom_study_arcn_lc.sql again and see what happens. Follow the instructions above to run the script again. When you run the script again you will receive an error message in the Messages pane at the bottom of the Query Tool windows that says something like the following:
ERROR:  duplicate key value violates unique constraint "dom_study_data_value_ukey"
DETAIL:  Key (data_value)=(arcn_lc) already exists.
SQL state: 23505
This error message illustrates that the database is doing it’s job to enforce the unique constraint dom_study_data_value_ukey that we set up on the data_value column of the dom_study table. Thus, if we want to try using the import tool to add this row of data to the dom_study table, then we’ll need to first delete the existing row so we don’t violate the unique key constraint on the data_value column.
Deleting Rows from a Table
As with most things in PostgreSQL there is more than one way to delete rows from a table. First, let’s try the manual deletion method. This method is useful for deleting one or a few rows at a time. While viewing the dom_study table in View/Edit Data mode (step 5, above) do the following:
- Select the row by clicking on the row number (Figure 3, green arrow).
- Click on the delete button (Figure 3, red arrow). A red line will appear across the row.
- Think long and hard about whether or not you want to delete this row because you can’t undo it once you save the changes. In this case we do want to delete the row so that we can reinsert it using the import tool. However, in your own data be cautious when deleting rows.
- Once you’re certain you want to delete the row, then click the save data changes button (Figure 3, blue arrow) to save the changes to the database.
- The row has been deleted.

We just deleted the only row in the dom_study table using the manual deletion method. Next, we’ll use a SQL DELETE script to perform the same action. The delete script method is best used when deleting many rows at a time. However, we first need to reinsert the row of data into the dom_study table. To do so please rerun the 01_insert_into_dom_study_arcn_lc.sql script following the steps listed above in the “Insert Script” section.
After you have inserted the data into the dom_study table again, take a look at the unique_id field. Notice that the value in the unique_id field is now 2. This illustrates the autoincrementing feature of a serial data type. The first time the row was inserted the unique_id value was 1. When the row is inserted again, the sequence that controls the autoincrementing behavior of this column recognizes the next value in the sequence, which is the integer 2. To delete this row using a SQL DELETE script follow the instructions below.
- Open a query tool window, then click on the Open File tool, and then navigate to the clone of your fork of the learning-data-science repository.
- Open the 02_delete_from_dom_study_arcn_lc.sql file under Lessons/Lesson_003. The sql file will open in the query tool (Figure 4).
- Click the Execute button (Figure 4, blue arrow) to run the script. In the Data Output Pane at the bottom of the Query tool window you will see a preview of the row that will be deleted. You should carefully inspect the preview to confirm it’s what you expect to be deleted. If you realize that you made a mistake and don’t want to perform the deletion you can click the “Rollback” button (Figure 4, red arrow) which will abort the transaction.
- Next, once you’re certain you want to delete the row, then click on the “Commit” button (Figure 4, green arrow) to commit (i.e., save) the changes to the database.
- Lastly, right click on the dom_study table, then click on View/Edit Data, and then on All Rows. The dom_study table will open and you should see that the table is empty.

Now we’ve seen how to delete rows using the manual and SQL DELETE script methods. The dom_study table is now empty and ready for us to insert the row again by importing the data from a CSV file.
Importing Data from a CSV File into a PostgreSQL Table
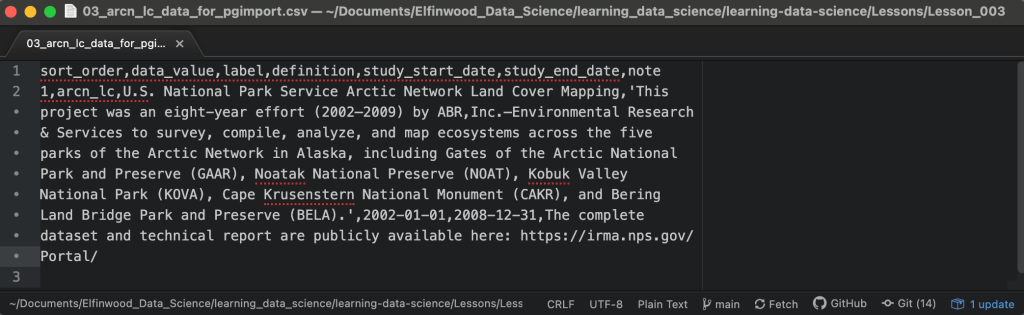
Open your text editor of choice, click on the open file tool, navigate to the clone of your fork of the learning-data-science repository, and then open the arcn_lc_data_for_pgimport.csv file (Figure 5). Let’s briefly inspect this CSV file. The first line is the header row, the second line is the row of data to insert. This is a comma separated values (CSV) file, thus the values are comma delimited. Therefore, for the import to work correctly, if any of the values contain commas, then those values must be enclosed in quotes to escape the commas within the values. Otherwise PostgreSQL will interpret the commas within the values as delimiters and will throw an error. This is because the number of data values interpreted by PostgreSQL won’t match the number of columns you are attempting to import data into. In this case single quotes are used on the definition value (i.e. ‘This project was an eight-year effort…’). However, double quotes would work just as well.
The values are the same as in the insert script from Figure 1, and the order matches that of the respective columns in the dom_study table. The import tool allows the user to select which columns data will be imported into, thus when using the import tool it is not necessary to import data into every column in a table. The import tool also allows you to select a custom column order to match the order of the data values in the CSV file. To import the data from the arcn_lc_data_for_pgimport.csv file follow these instructions:
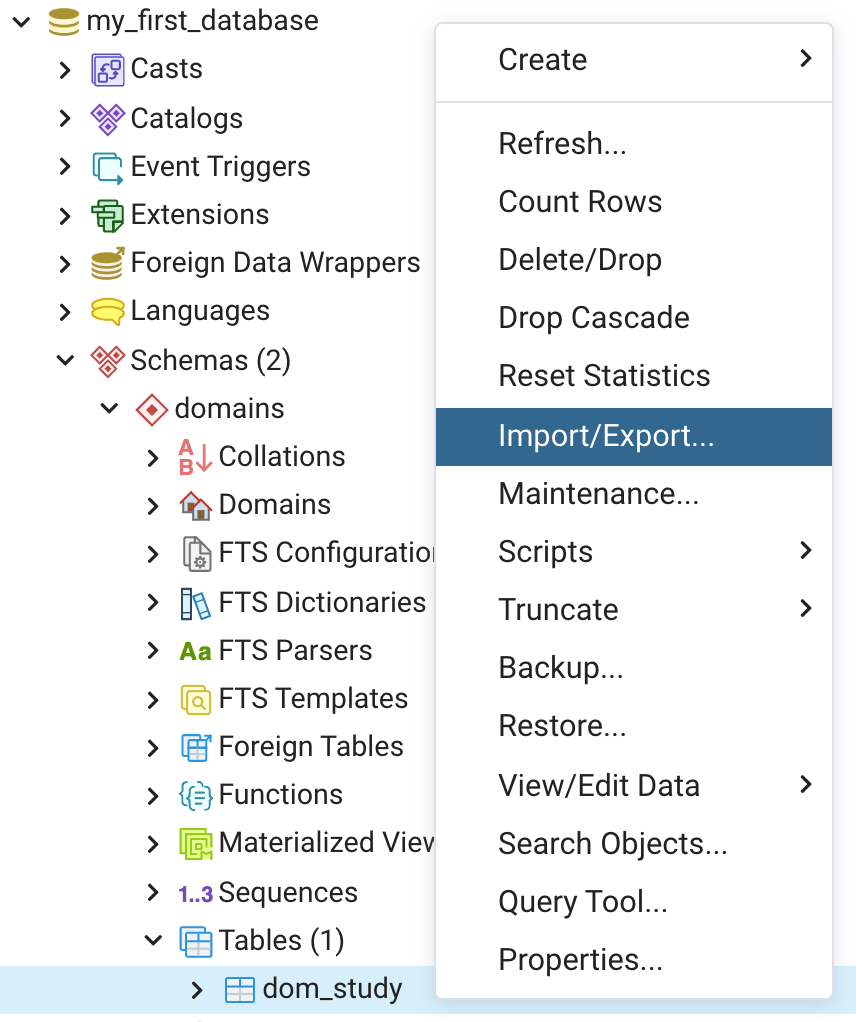
- In pgAdmin right click on the dom_study table and then click on “Import/Export…” (Figure 6). The Import/Export tool dialog will open (Figure 7, bottom).
- In the options tab click on the Import/Export toggle button to select “Import” (Figure 7, bottom).
- Under “File Info” select the arcn_lc_data_for_pgimport.csv file for “Filename”, and then select UTF8 for the encoding.
- Under “Miscellaneous” toggle the “Header” button to “Yes”, select a comma for the delimiter, and select a single quote for “Quote” and “Escape”. Note that if we had used double quotes to escape the commas in the definition value then you would select double quotes here.
- Click on the “Columns” tab (Figure 7, upper left). In “Columns to Import”, since we are not importing data into the unique_id column click the “x” next to the unique_id to remove it from list.
- Now click on white space in the “Columns to Import” cell. You will see a drop down with a list of the column names in the dom_study table (Figure 7, upper center). If you wanted to list the columns in a custom order you could remove all the columns, as we did above for unique_id, and then add them from this list in the order you choose. However, the columns are already in the same order as the data values in the CSV file, so we won’t make any changes here. Click outside the “Columns to Import” cell to close the dropdown (Figure 7, upper right).
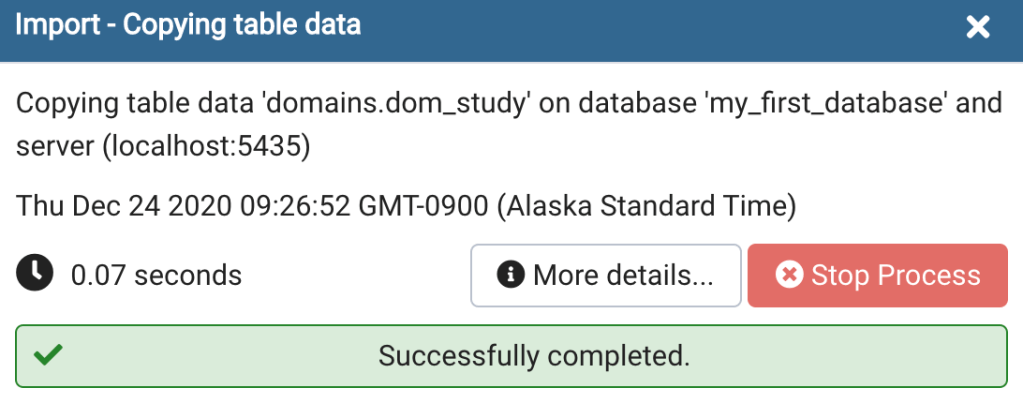
- Lastly, click the OK button to start the import. If the import was successful you will eventually see a message similar to Figure 8.
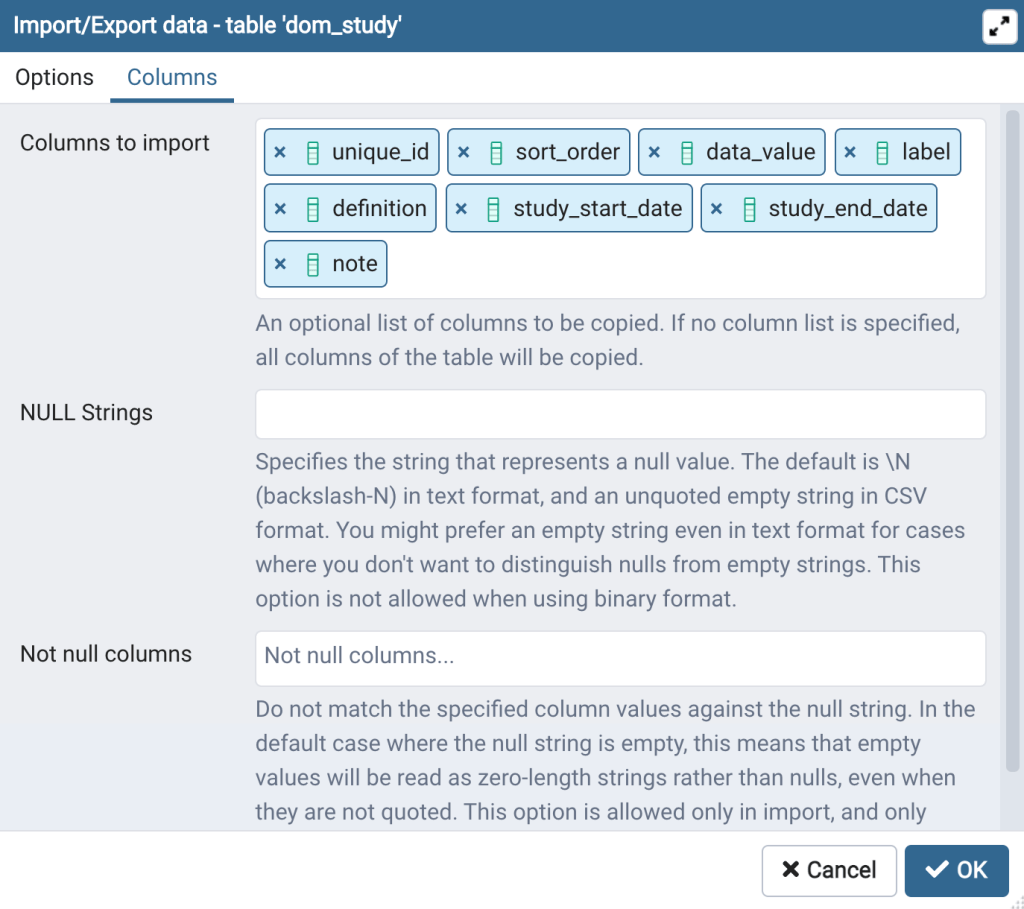
The Columns tab with all columns. 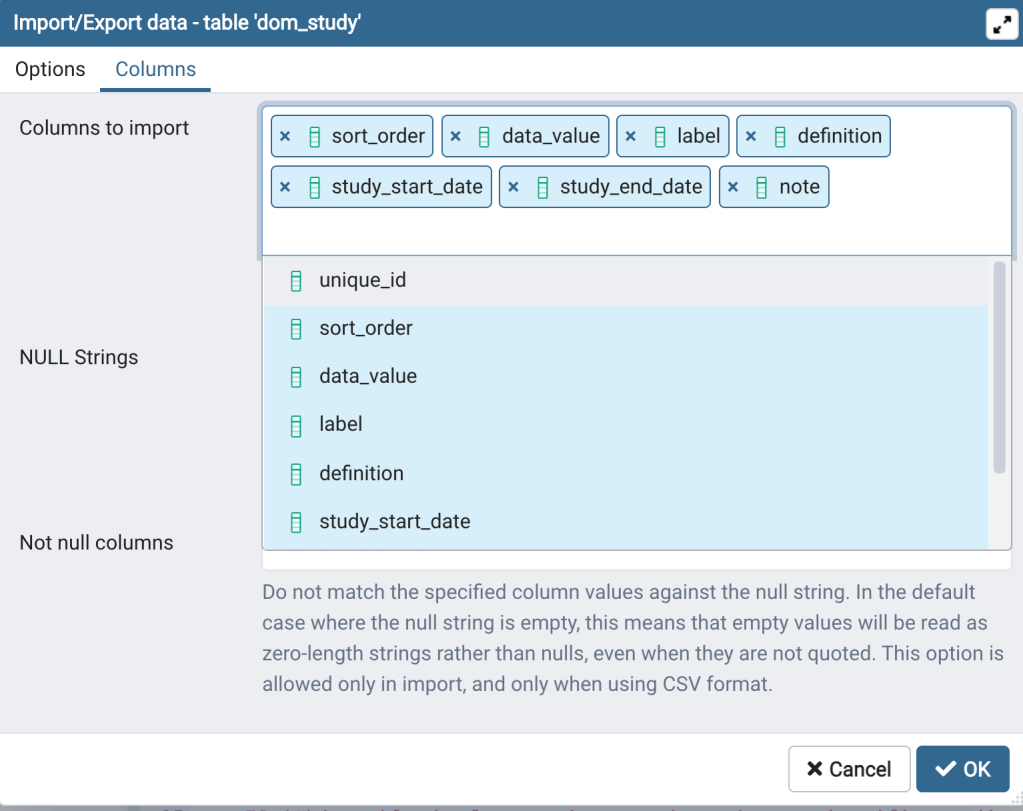
The Columns tab with unique_id removed and drop down list displayed. 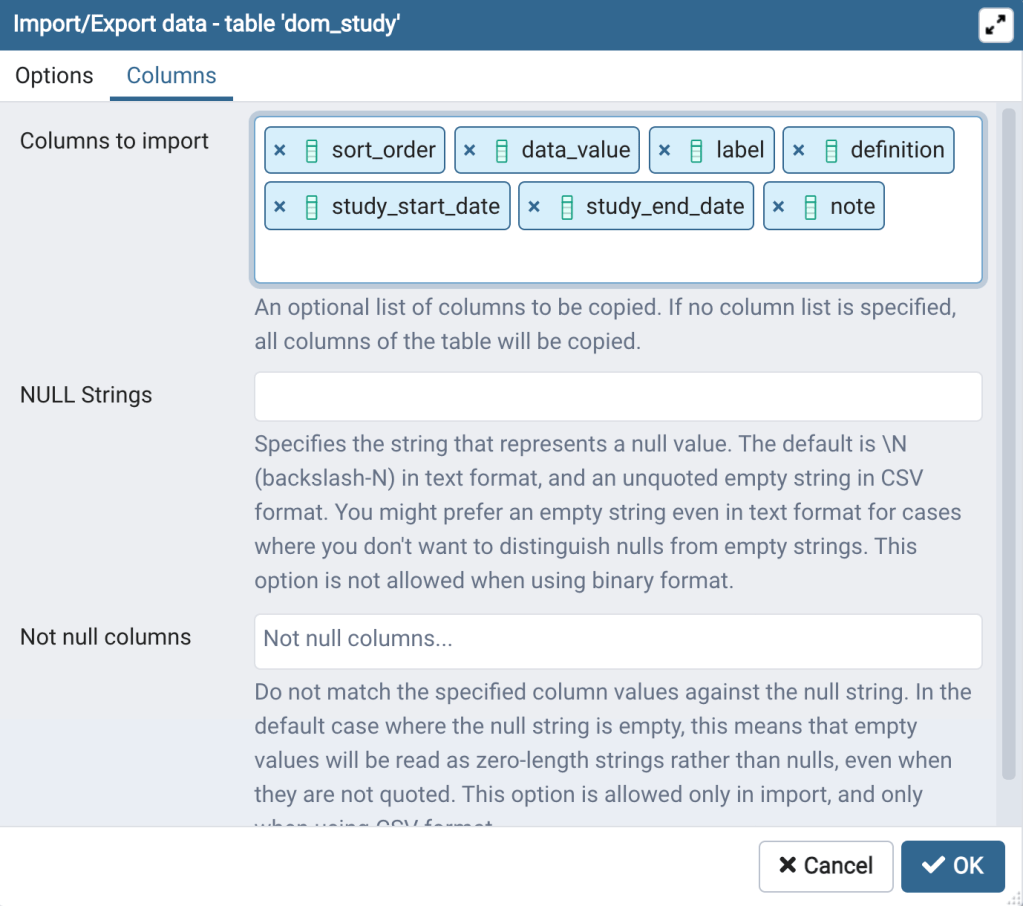
The Columns tab ready for importing the data. 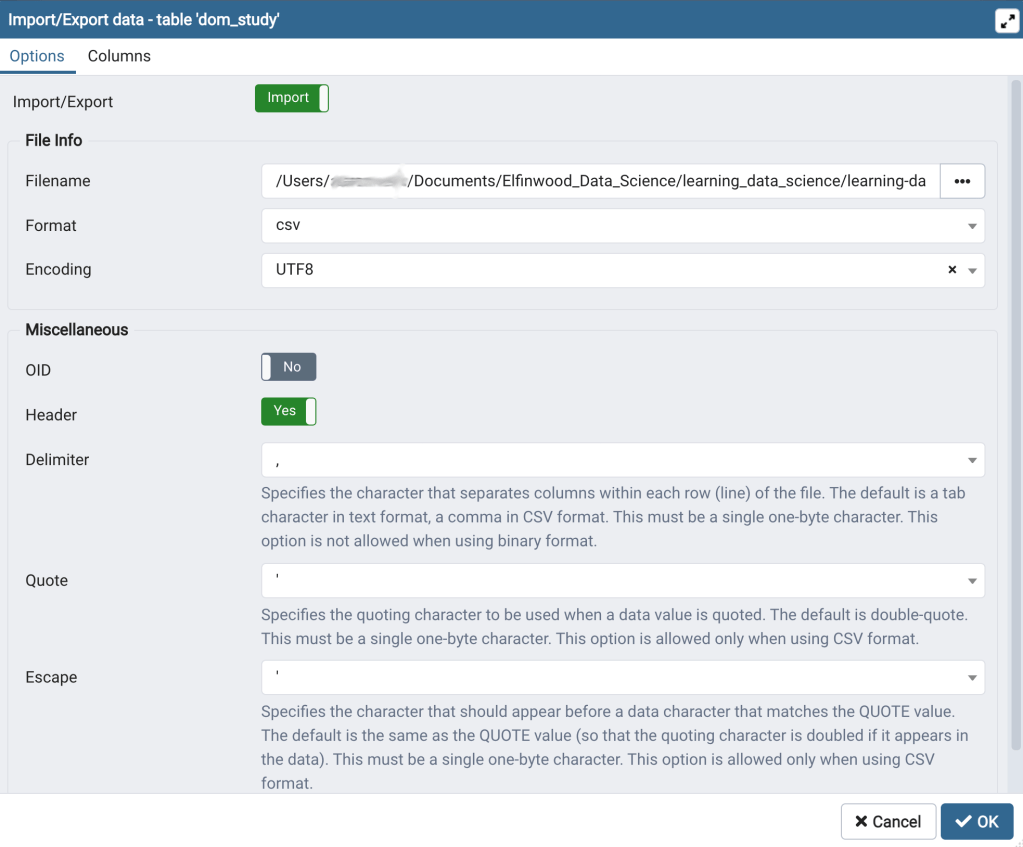
The Options tab in the pgAdmin Import/Export tool dialog.
Now, open the dom_study table in View/Edit Data mode. You should see the row of data that we just imported. Congratulations! You just inserted your first row of data into a PostgreSQL table!
Recommended Reading
As a supplement to this post, I encourage you to read the PostgreSQL documentation on transactions, the BEGIN, ROLLBACK, and RETURNING clauses, and the sections on inserting and deleting data.
Next Time on Elfinwood Data Science Blog
In this post, we inserted data into the dom_study table using an INSERT script and importing from a CSV file. We also learned 2 different methods to delete rows from a table. In the next post we’ll create 2 new tables, insert data into the tables, and create a foreign key constraint.
If you like this post then please consider subscribing to this blog (see below) or following me on social media.If you’d like to follow this blog, but you don’t want to follow by subscribing through WordPress then a couple of options exist. You can “Like” the Elfinwood Data Science Blog Facebook Page or send me your email using the form on the Contacts Page and I’ll add you to the blog’s email list.
Follow My Blog
Copyright © 2021, Aaron Wells

2 thoughts on “Lesson 003: Inserting Data into a Table”