
Introduction
In the previous post I covered inserting data into a PostgreSQL table; and we used the Lesson_003 files in the learning-data-science GitHub repository to insert data into the dom_study table. In this post, Lesson 004, we’ll create 2 more tables, set up foreign key constraints, and insert data into the 2 tables. Since data analysis and management are best learned by doing, the objective of this and future posts is to get readers hands on experience using PostgreSQL and R. This lesson builds on earlier posts so, if this is your first time reading this blog and you’d like to follow along on your computer, then please go back and start from the post Learning Data Science and work through the lessons up to this point.
For this post we’ll be using the files in the Lesson_004 folder in the learning-data-science repository. If you have not already forked the learning-data-science repository, and cloned the fork to your computer, please do so now following the instructions provided in the post Learning Data Science. If you have previously forked and cloned the repository, but don’t have the files for this lesson, then follow the instructions here to update your fork with the latest files.
If you are not familiar with version control using Git and GitHub, I recommend going back and working through the hands on tutorials in my series on version control starting with “Version Control: An Overview.”
Foreign Key Constraints
A foreign key constraint defines a relationship between values in columns from 2 different tables such that the value in the column of the first table must be present in the related column of the second table. Figure 1 provides a simple example of a foreign key relationship between 2 tables. Table 1 defines a list of acceptable values that can be entered into the “fruit” column in Table 2. As shown, the data in Table 2 is valid since all of the values are present in the “data_value” column in Table 1. However, were you to attempt to add a value into the “fruit” column that is not in Table 1, ‘strawberry’ for instance, then the database would enforce the constraint and not allow you to save the data. The only way to add a new value into the “fruit” column in Table 2 would be to first add it into the “data_value” column in Table 1.

The foreign key relationship illustrated in Figure 1 can also be expressed in an Entity-Relationship (ER) model. In terms of databases, an ER model defines the relationships between the table and columns in a database, including database constraints. A simple ER model diagram defining the relationship between Tables 1 and 2 is presented in Figure 2.

The line connecting Table 1 to Table 2 with the three forks at the end indicates a one-to-many foreign key relationship, i.e, one instance of a value in Table 1 relates to one or more values in Table 2. Note also that the primary key in Table 2 consists of two columns, date and fruit. As such, each combination of date and fruit entered into the database must be unique or else the database will throw an error. I’ll cover ER models in more detail in the next post in which we’ll create an ER model for my_first_database.
Creating the sample Table
To illustrate the use of foreign key constraints in my_first_database, we first need to create another table, the sample table. The sample table will be used to store information about scientific samples (e.g., plots, nets, nests, stations).
To create the sample table follow the steps provided in Lesson 002: Creating Tables in PostgreSQL using the files 01_create_seq_public_sample_uid_serial_seq.sql and 02_create_table_public_sample.sql located in the Lesson_004 folder of the clone of your fork of the learning-data-science repository. The first file creates a sequence to use in the unique_id field in the sample table, run this file first. Next, run the second file, which will create the sample table in the public schema. Let’s take a closer look at the code that creates the sample table (Figure 3).
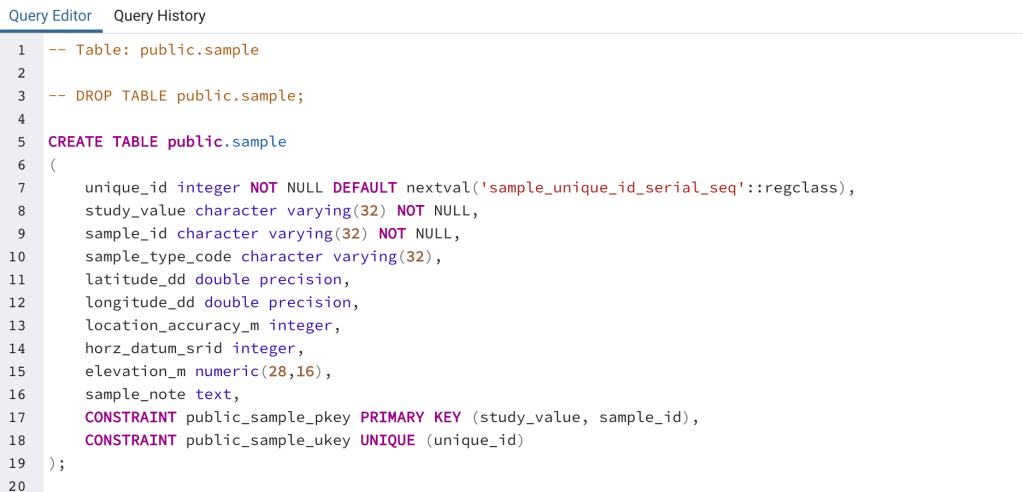
Figure 3 shows the columns in the newly created public.sample table. This table is used to store metadata about scientific samples (e.g., plots, nets, nests, stations), including the study for which the samples are being collected (study_value), the sample id, and location information. The study_value field is designed to store information about the study that each sample is associated with, and the allowable values for this field come from the dom_study table. Thus, to enforce this relationship we need to create a foreign key between the study_value field in the public.sample table and the data_value field in the dom.dom_study table. In this way the database with restrict the allowable values for the study_value field to those values contained in the dom_study table.
Creating a Foreign Key
SQL Script Method
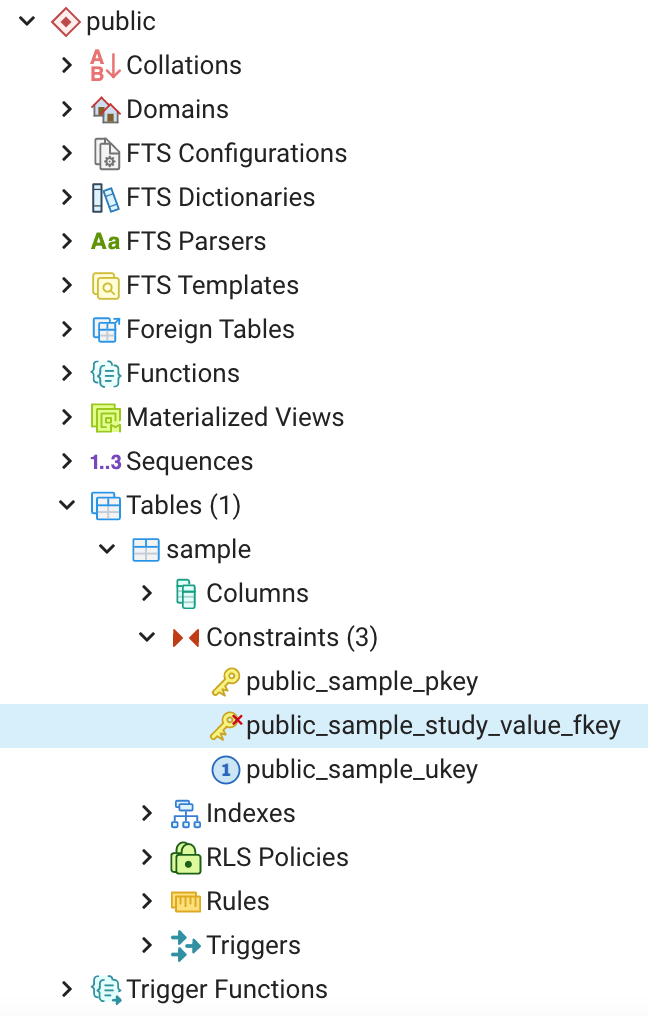
To create the foreign key, open the 03_create_public_sample_study_value_fkey.sql script in pgAdmin and run it. This will create the public_sample_study_value_fkey. To see this foreign key in pgAdmin, in the tree on the left, click on the public schema, then “Tables”, then “sample”, and finally “Constraints ” (Figure 4). Here we can see all the constraints on the sample table, including those that we created in past blog posts. Let’s now examine the script used to create the study_value foreign key (Figure 5)

To begin, on line 5 the ALTER TABLE command tells PostgreSQL that we want to make a change to the public.sample table. The change we want to make is indicated on line 6 by the ADD CONSTRAINT command. Specifically we want to add a constraint entitled public_sample_study_value_fkey, which is a FOREIGN KEY, and the key applies to the study_value column. Next, we need to tell PostgreSQL which table and column that the study_value column should reference. To do this, on line 7 we use the REFERENCES command to specify the study_value column should reference the data_value column in the domains.dom_study table.
Pro Tip: When naming foreign keys use a naming convention that provides information about the intended purpose of the foreign key. For instance, include the schema and table name, and the column name to which the key applies. End the name with _fkey to distinguish foreign keys from other types of key constraints.
Next we specify the type of match between the 2 columns. MATCH SIMPLE is the default option and means that values in the public.sample.study_value must match a value in the domains.dom_study.data_value column, and the only exception is when the study_value column is NULL, in which case the constraint is simply ignored. The other option is MATCH FULL, which is applicable in cases when a multiple column foreign key is used. We won’t cover MATCH FULL or multiple column foreign keys any further here. Lines 8 and 9 tells] the database what should happen in the event that an action is performs (e.g., UPDATE) and that action violates the foreign key.

In this case we have set these both to NO ACTION, which is the default, and means that if a violation occurs then the database will not perform the action and will instead produce an error message (Figure 6). What do we mean by a “violation”. One example of a violation would be if you attempted to enter a value into the public.sample.study_value column that is not in the domains.dom_study.data_value column. This is illustrated in Figure 6 which shows the error message that resulted when I attempted to update the public.sample.study_value column with the value ‘test’ which, you’ll recall from lesson 003, is not present in the domains.dom_study.data_value column. Lastly, the comment on the constraint provides a short description of the constraint and this description will be stored in the database as metadata.

Note that when we first created the sample table that we could have saved a step and included the create foreign key code in the create table script. This is illustrated in Figure 7.
Create Foreign Key Tool
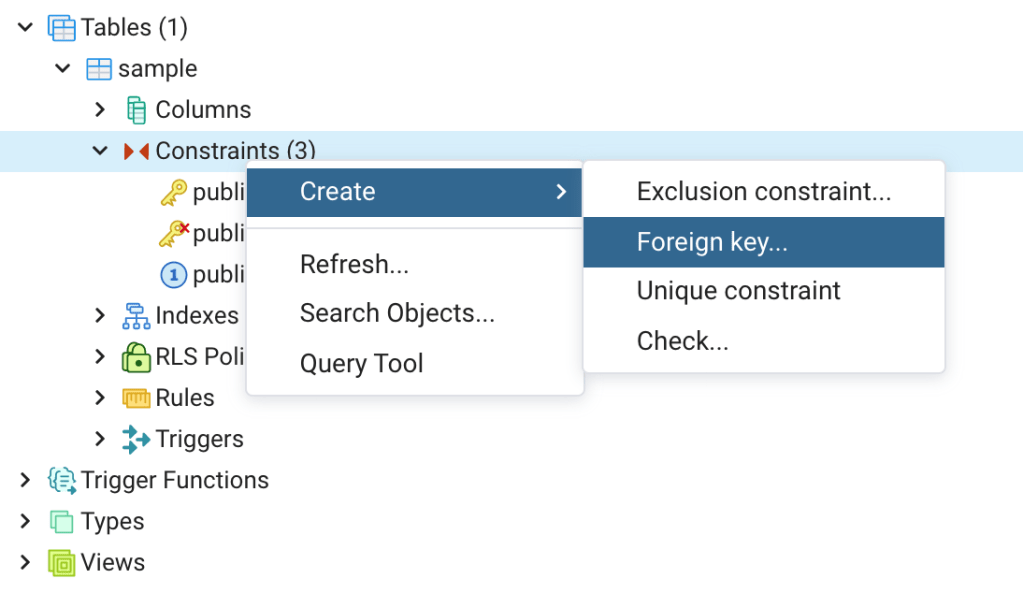
In addition to using a SQL script to create a foreign key, pgAdmin provides a tool to perform this task. To use the tool, first navigate to the sample table in the pgAdmin tree and click on it. Then right click on “Constraints” and then click on “Create” (Figure 8).
You’ll notice that you can use this tool to create several types of key constraints. Click on “Foreign key…”, the Create – Foreign Key tool will open (Figure 9). On the General tab (Figure 9 upper left) enter the Name and Comment. Next, click on the Definition tab (Figure 9 upper center) and accept the defaults. Note that this is where you can select your match type (default = SIMPLE). Now click on the Columns tab (Figure 9, upper right).

Create – Foreign Key tool General Tab 
Create – Foreign Key tool Definition Tab 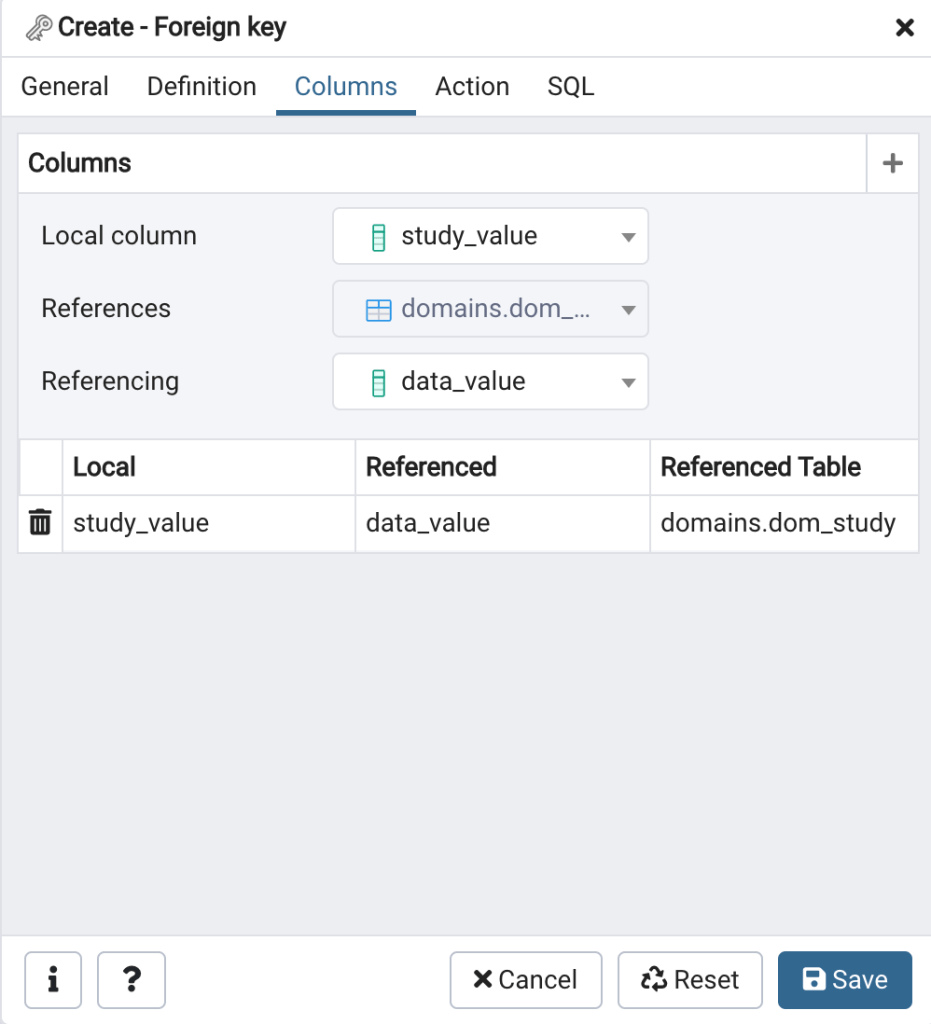
Create – Foreign Key tool Columns Tab 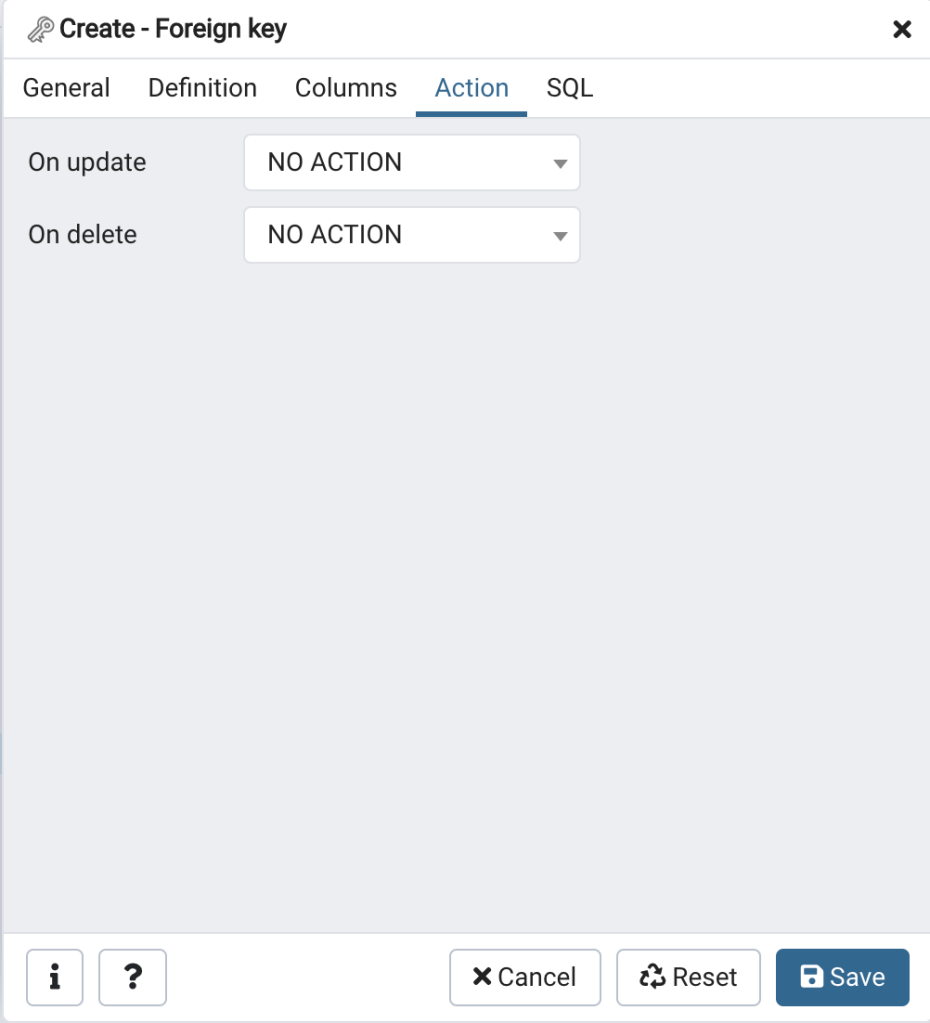
Create – Foreign Key tool Action Tab 
Create – Foreign Key tool SQL Tab
This is where you select the “local” column, i.e., the column in the table for which you want to create the foreign key, and the referenced table and column. In this case the local column is study_value, the referenced table is the domains.dom_study table, and the referenced column is data_value. Once you’ve selected the column click on the + icon in the upper right to add the columns to the key. The Action tab (Figure 9 lower left) is where you can select what should happen if the foreign key is violated. The default is NO ACTION which we’ll accept here. Lastly, click on the SQL tab; you’ll see that the tool is building a SQL script based on your selections. You can use this as a learning tool, or copy out the SQL and run it in the Query Tool to create the foreign key. To use the tool to create the foreign key simply click on the Save button in the lower right.
Creating the dom_sample_type Table
Next we’re going to create another domain table, the domains.dom_sample_type table. The dom_sample_type table is for storing metadata about the type of sample (e.g., plot, net, nest, station) where observations are recorded. To create the dom_sample_type table follow the steps provided in Lesson 002: Creating Tables in PostgreSQL using the files 04_create_dom_sample_type_serial_seq.sql and 05_create_dom_sample_type_tbl.sql located in the Lesson_004 folder of the clone of your fork of the learning-data-science repository.
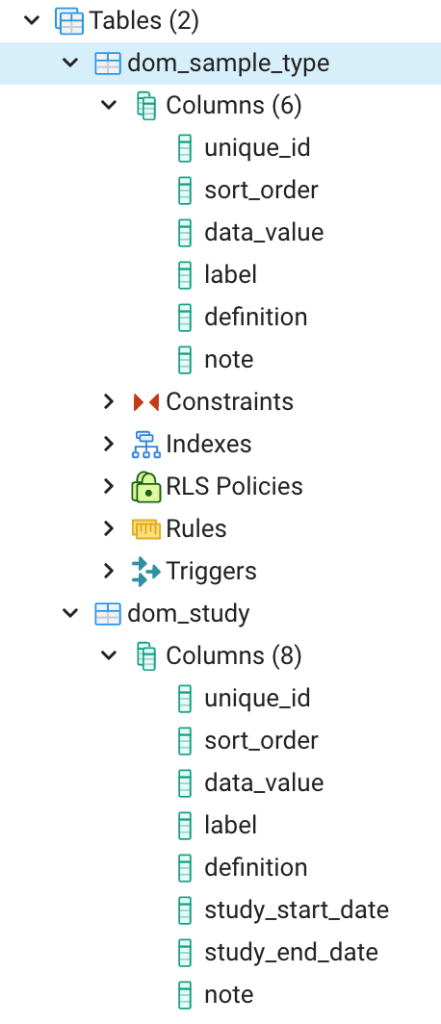
Take a look at the columns in the domains.dom_sample_type table, and compare them to the columns in the domains.dom_study table (Figure 10). You’ll notice that the columns are very similar to those in the domains.dom_study table. This is because we’ve adopted a standardized column format for our domain table that always includes the following fields: unique_id, sort_order, data_value, label, definition, and note. This standardized format will make it easier to manage and use the domain tables in the future.
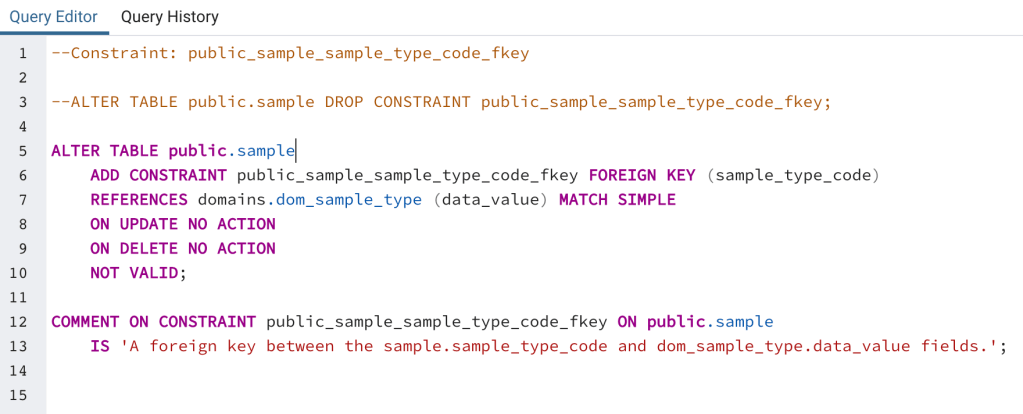
The domains.dom_sample_type table is designed to store allowable values for the sample_type_code column in the public.sample table. Therefore next we’ll create a foreign key to formalize and enforce this relationship in the database. To create the foreign key open the SQL script 06_create_public_sample_sample_type_code_fkey.sql in a Query Tool window in pgAdmin and run it (Figure 11). We see that the foreign key constraint is set up on the sample_type_code column and references the data_value column from the domains.dom_sample_type table.
Inserting Data into the dom_sample_type and sample Tables
Next, we’ll insert data into the newly created dom_sample_type and sample tables. We’ll start with dom_sample_type since it’s a domain table and defines the allowable values in the sample.sample_type_code column. To insert data into dom_sample_type open the 07_insert_into_dom_sample_type_vegr.sql script in a Query Tool window in pgAdmin and run it (Figure 12). Don’t forget to click the “Commit’ button after reviewing the results from RETURNING. The script will insert a single row with the data_value ‘vegr’ which is short for Vegetation Relevé Plot.
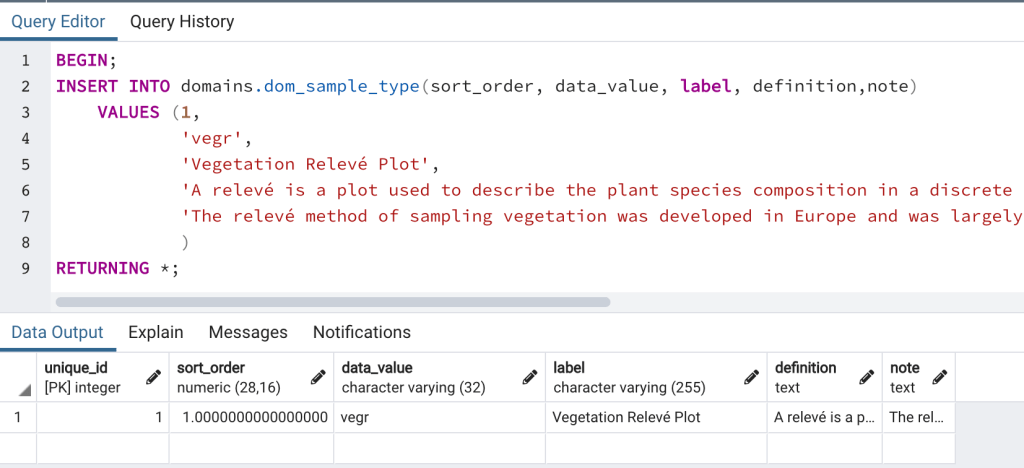
A relevé is a plot used to describe the plant species composition in a discrete plant community. All plant taxa occurring in the plot area are listed along with their respective foliar cover, which is typically recorded using ocular cover estimates. Data describing the general environment and soils are also collected at each plot. Plots are typically circular with a 10 meter radius. However, the plot dimensions can be adjusted as needed to fit within a plant community or to meet the needs of a particular study. The relevé method of sampling vegetation was developed in Europe and was largely standardized by the Swiss ecologist Josias Braun-Blanquet.
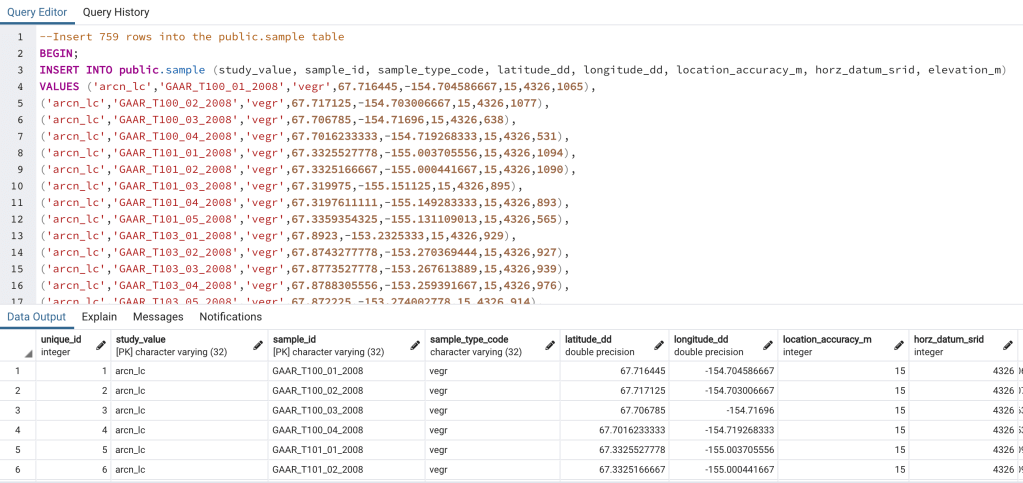
Lastly, let’s insert data into the public.sample table. To insert data into this table open the 08_insert_into_public_sample_arcn_lc.sql script in a Query Tool window in pgAdmin and run it (Figure 13). The script will insert 759 rows of data into the table.
Foreign key relationships work in 2 ways. First, as discussed above, they prevent illegal data values from being entered into the table that contains the foreign key. Second, they work to prevent the deletion of data from the related table. To illustrate this, open the domains.dom_sample_type table in View/Edit data mode and try to delete the first row. If you’re unfamiliar with deleting data using the manual method then follow the instructions here: Deleting Rows from a Table. After clicking the delete button PostgreSQL will prevent you from deleting the row and will show a message similar to Figure 14. This is because the value ‘vegr’ is present in one or more rows in the public.sample.sample_type_code column.

Recommended Reading
As a supplement to this post, I encourage you to read the PostgreSQL documentation on foreign keys 5.4.5 Foreign Keys. For more on Entity Relationship models I recommend Chapter 8 The Entity Relationship Data Model in Database Design 2nd Edition by Adrienne Watt.
Next Time on Elfinwood Data Science Blog
In this post, we created tables, created foreign keys between domain tables and a data table, and inserted data into the tables. In the next post we’ll take a step back and prepare an Entity Relationship (ER) model for my_first_database. We’ll use the ER model in future posts to guide database development.
If you like this post then please consider subscribing to this blog (see below) or following me on social media.If you’d like to follow this blog, but you don’t want to follow by subscribing through WordPress then a couple of options exist. You can “Like” the Elfinwood Data Science Blog Facebook Page or send me your email using the form on the Contacts Page and I’ll add you to the blog’s email list.
Follow My Blog
Copyright © 2021, Aaron Wells

One thought on “Lesson 004: Foreign Key Constraints”