
Introduction
In the previous post I introduced PostgreSQL schemas, and we used the Lesson_001 files in the learning-data-science GitHub repository to create a schema for organizing domain tables. In this post, Lesson 002, we’ll create a sequence and a data table, and add column comments. Since data analysis and management are best learned by doing, the objective of this and future posts is to get readers hands on experience using PostgreSQL and R. This lesson builds on earlier posts, so if this is your first time reading this blog and you’d like to follow along on your computer then, please go back and start from the post Learning Data Science and work through the lessons up to this point.
For this post we’ll be using the files in the Lesson_002 folder in the learning-data-science repository. If you have not already forked the learning-data-science repository, and cloned the fork to your computer, please do so now following the instructions provided in the post Learning Data Science. If you have previously forked and cloned the repository, but don’t have the files for this lesson, then later in this post I’ll provide instructions for updating your fork.
If you are not familiar with version control using Git and GitHub, I recommend going back and working through the hands on tutorials in my series on version control starting with “Version Control: An Overview.”
PostgreSQL Tables
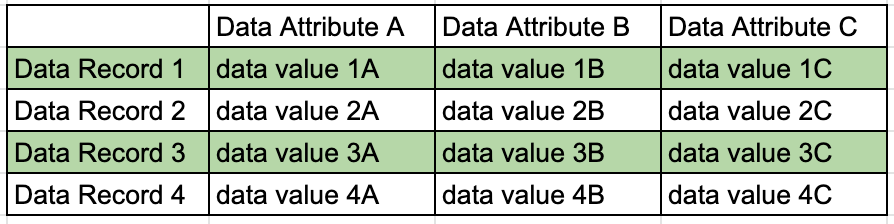
Tables are used to store data in a relational database. In a database table rows represent data records, columns represent data attributes, and the cells within the table contain the data values for each data record and attribute. Figure 1 shows an example of a simple database table model illustrating the concepts of data records, attributes, and values.
The columns in a table are each assigned a name, and are defined by their data type (e.g., integer) and database constraints. Information about data types and database constraints is stored in the database as table and column metadata.
Data Types
Data are classified based on the values they can take on (e.g., integer). The different classes of data are referred to as data types. Each column within a table is assigned a column name and a data type based on the data attributes that the column is designed to contain. Data types, by enforcing what kind of data can be stored in a column, are one way that relational database ensure data integrity.
For instance, imagine you have a database column that is designed to contain an integer value. Were you to accidentally enter text, for instance the word “one”, into that field the database would stop you from doing this and warn you that the data entered doesn’t match the data type for that column. Without the requirement to set a data type you wouldn’t get a warning. Let’s say that later on you wanted to calculate an average and standard deviation from the data in that column, well you would get an error because you obviously can’t perform math on text values. PostgreSQL has a variety of data types ranging from text to numeric, arrays to monetary data types, and from data/time to geometric data types. The most common data types you’ll use are described briefly below:
- Text: Character strings of unlimited number of characters.
- Character varying: Character strings up to a predetermined number of characters.
- Integer: Whole numbers.
- Numeric: Decimal numbers of a predetermined precision.
- Boolean: True/False data.
- Date: Calendar date in year-month-day format.
- Serial: Auto-incrementing integer
Database Constraints
Referential integrity is a database construct in which relationships between data elements are structured and enforced through the use of database constraints. Database constraints are a fundamental and important element of a relational database and help ensure data integrity. I’ll cover database constraints in more detail in a future post. However, for the purpose of this post here is a quick overview of primary and unique keys.
- Primary keys: Defines a column or group of columns that are used as a unique identifier within and between tables. Null values are not allowed in any columns included in a primary key. Single column primary keys require that the values in each row are unique, while multi-column primary keys require that the combination of values across all columns in a row that are part of the key are unique.
- Unique keys: Ensures that the values in each row of a column, or across a set of columns are unique.
Database constraints are at the core of a good relational database as they define the rules by which the data in different tables and columns relate to each other. You may find yourself frustrated at times when working in a database with proper referential integrity enforced using database constraints. This is because the database will block you from performing some action that you may want to complete if that action goes against the database constraints. When this happens take a deep breath and bear in mind that this is exactly why database constraints exist. From my own personal experience I know that the few minutes it takes to perform a database action in line with the constraints will save you hours later on tracking down and fixing database issues were there no constraints in place. I’ll provide some practical examples of this in future posts.
Creating a PostgreSQL Table
There are several ways to create a PostgreSQL table. To begin we’ll use a SQL create table script, and then I’ll run through how to use the Create Table tool in pgAdmin. However, to ensure you have the most up-to-date files for this lesson, let’s first review how to update your fork of the learning-data-science repository.
Updating your Fork of the learning-data-science Repository
If you have not already forked the learning-data-science repository, and cloned the fork to your computer, please do so now following the instructions provided in the post Learning Data Science. After you’ve completed this you will have the files you need for this lesson, and you can skip the next section and pick up the lesson again below starting at “Creating a Table using SQL.”
However, if you have previously forked and cloned the repository, but don’t have the files for this lesson (i.e., Lessons/Lesson_002), then please follow the instructions below to update your fork with the latest lesson files:
Setting the Upstream Repository
First, navigate to the learning-data-science repository on your computer and open a terminal (MacOS) or GitBash(Windows). Next, list the currently configured remote repository for your fork using the following command:
git remote -vYou should see something like the following returned:
   origin  https://github.com/YOUR_USERNAME/learning-data-science.git (fetch)
   origin  https://github.com/YOUR_USERNAME/learning-data-science.git (push)
Next, specify the original learning-data-science repository as the upstream repository that will be synced with the fork. Use the following command:
git remote add upstream https://github.com/elfinwood-data-sci/learning-data-science.gitNow verify the new upstream repository using the “git remote -v” command (as above). You should see something like the following returned:
origin    https://github.com/YOUR_USERNAME/learning-data-science.git (fetch)
origin    https://github.com/YOUR_USERNAME/learning-data-science.git (push)
upstream  https://github.com/elfinwood-data-sci/learning-data-science.git (fetch)
upstream  https://github.com/elfinwood-data-sci/learning-data-science.git(push)
Syncing your Fork
The next stage is to sync your fork with the original learning-data-science repository. First, fetch the files from the upstream repository using the following command:
git pull upstream masterAfter you hit Enter if you get something similar to the following message then your files were already up-to-date with the most recent files in the elfinwood-data-sci/learning-data-science repository.
From https://github.com/elfinwood-data-sci/learning-data-science
 branch            master     -> FETCH_HEAD
Already up-to-date.
If you do not receive the above message, but instead a text editor opens and you are asked to add a merge message, then your files were not up to date. Depending on your operating system follow the instructions below to write and save a merge message:
Mac OS
- Type i to switch into insert mode so that you can begin editing the file.
- Enter a commit message (Figure 2).
- Once you’re done, press the escape key to exit insert mode and enter back to command mode.
- Type :wq to save (w = write) and exit (q = quit) the file.
Windows
- Move the cursor to line one.
- A default commit message should have been automatically populated at line one. If so, then make a small change (e.g. push the space bar). This should activate the “Save” icon in the upper left corner (Figure 4).
- Click “Save” and close the text editor.
- If there was no default message, then enter a commit message onto line one and click save and close the text editor.
After you’ve saved the merge message you should see something like the following in your terminal where A_NEW_FILE.txt represents one or more new lesson files or folders pulled in from the elfinwood-data-sci/learning-data-science repository.
remote: Enumerating objects: 4, done.
remote: Counting objects: 100% (4/4), done.
remote: Compressing objects: 100% (3/3), done.
remote: Total 3 (delta 1), reused 0 (delta 0), pack-reused 0
Unpacking objects: 100% (3/3), done.
From https://github.com/elfinwood-data-sci/learning-data-science
 *branch            master     -> FETCH_HEAD
 4c78e88..a5c6b45  master     -> upstream/master
Merge made by the 'recursive' strategy.
 A_NEW_FILE.txt | 1 +
 1 file changed, 1 insertion(+)
 create mode 100644 A_NEW_FILE.txt
Pushing to your Fork on GitHub
Now that you’ve updated the files in your local repository, the next step is to push the changes to your remote fork so as to keep it up to date. To push to your remote fork use the following command:
git push origin masterYou should see something like the following returned:
Counting objects: 2, done.
Delta compression using up to 4 threads.
Compressing objects: 100% (2/2), done.
Writing objects: 100% (2/2), 326 bytes | 326.00 KiB/s, done.
Total 2 (delta 1), reused 0 (delta 0)
remote: Resolving deltas: 100% (1/1), completed with 1 local object.
To https://github.com/YOUR_USERNAME/learning-data-science.git
    07852de..8a4d5aa  master -> master
At this point you should have the most recent lesson files in your local and remote repositories. You are now ready to begin this lesson.
Creating a Table using SQL
We’ll start by creating a table in the domains schema that we’ll call the “dom_study” table. The name of the table is designed to be informative as it includes the prefix “dom_” which indicates that it is a domain table, followed by “study” indicating the purpose of the table is to store information about scientific studies. The data collected as part of the studies will be stored in other related tables in this database. The table design will include a column with a serial data type (auto-incrementing integer) that will be used as the primary key. Columns with a serial data type are each associated with their own “sequence” which defines the settings and auto-incrementing behavior. So, before we can create the table we need to create a sequence using the below steps:
- First open pgAdmin, click on my_first_database to connect to it, and open a Query Tool window.
- Click on the Open File tool and navigate to the clone of your fork of the learning-data-science repository.
- Open the create_dom_study_serial_seq.sql file under Lessons/Lesson_002. The sql file will open in the query tool (Figure 2).
- Click the Execute button to run the script and create the sequence.
- You should now see that there is a new sequence called “dom_study_serial_seq” in the domains schema (Figure 3).
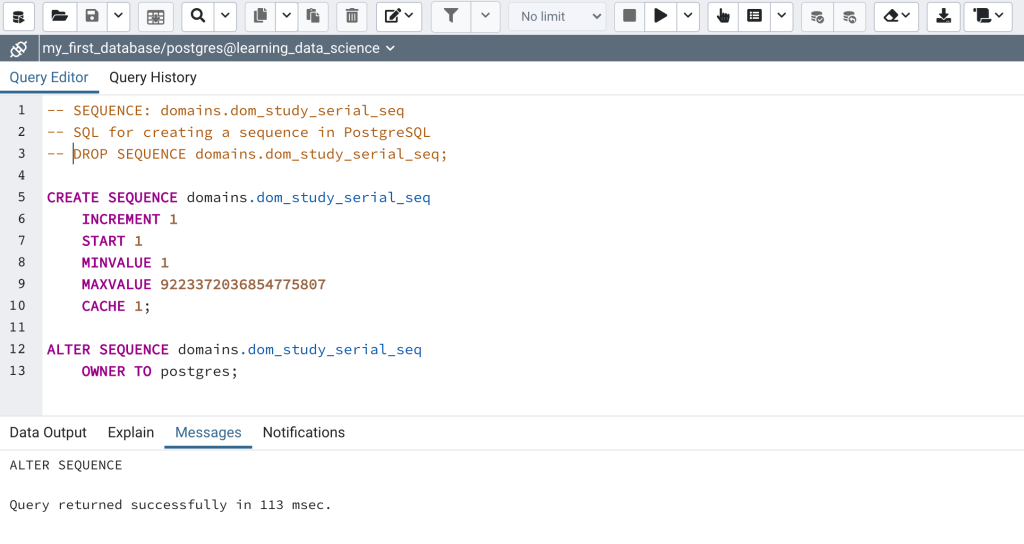
The name of the sequence, “dom_study_serial_seq“, is designed to be informative as it includes the name of the table (i.e., dom_study) that will use the sequence, followed by”_serial_seq” indicating it’s a sequence for a serial column. Let’s take a closer look at the create sequence script in Figure 2. Lines 1-3 are commented out, the first lists the name of the sequence that the script is designed to create, the second explains what the script is designed to do, and the third is the code for dropping (i.e., deleting) the sequence. The create sequence command begins on line 5, and begins with the “CREATE SEQUENCE” SQL command, followed by the name of the sequence qualified (using dot notation) by the schema (i.e., domains) within which the sequence will be created.
SQL and Semicolons: Did you notice the semicolons in the create sequence script in Figure 2? Semicolons are used in SQL to separate individual “statements.” In SQL each statement performs a specific action. This allows for more than one statement to be included and run in a single SQL script. When the script is run, the statements are run sequentially from top to bottom. The script in Figure 2 has 2 statements, the first creates the sequence, and the second alters the sequence to assign an owner.
Lines 6 through 10 are described below:
- Line 6: The increment value defines how much will be added to the previous value each time a new row is added. In this case the value will increase by 1.
- Line 7: The start value defines the first number of the sequence
- Line 8: The minimum value defines the smallest number in the sequence. This is most often set to the start value.
- Line 9: The maximum value defines the largest value that the sequence can take. This is typically set to a very large number so as to not be limiting.
- Line 10: The cached value specifies how many sequence numbers are to be preallocated and stored in memory for faster access. The default is 1.

Lastly, lines 12 and 13 include the ALTER SEQUENCE command which is used here to specify the owner of the sequence, in this case the user postgres.
Now that we’ve created a sequence for the column in our table with a serial data type, let’s create the domains.dom_study table following these steps:
- Open a Query Tool window in pgAdmin
- Click on the Open File tool and navigate to the clone of your fork of the learning-data-science repository.
- Open the create_dom_study_tbl.sql file under Lessons/Lesson_002. The sql file will open in the query tool (Figure 4).
- Click the Execute button to run the script and create the sequence.
- You should now see that there is a new dom_study table in the domains schema (Figure 5).

Now let’s review the create table script in Figure 4 and in the file create_dom_study_tbl.sql. As we’ve seen before, lines 1 and 3 are commented out, and include information about the script and the code to drop the table. The create table command starts on line 5, beginning with the “CREATE TABLE” SQL command, followed by the name of the table qualified (using dot notation) by the schema (i.e., domains) within which the table will be created. An open parenthesis is on line 6, which is closed on line 17. Everything within the parentheses is code to create column or constraints. Lines 7-14 are code for creating columns in the table, each line for creating a single column. The first word on each line is the column name (e.g., “unique_id” on line 7), followed by the data type (integer). In some cases that’s all the information needed. In other cases additional specifications are required. For instance, on line 7 the data type is followed by “NOT NULL” which is specifying that the id column can never be null. The last part on line 7 beginning with “DEFAULT” is the code for setting up the serial sequence we created above. On line 9, the data_value is also specified as NOT NULL.

Best Practice: When assigning names to database objects such as schemas, tables, columns, and constraints in PostgreSQL it’s a good practice to use all lower case, no spaces, and no numbers. In addition, database object names should be no more than 32 characters long, and names of numeric columns should end with an abbreviation for the unit of measure (e.g., _m for meter).
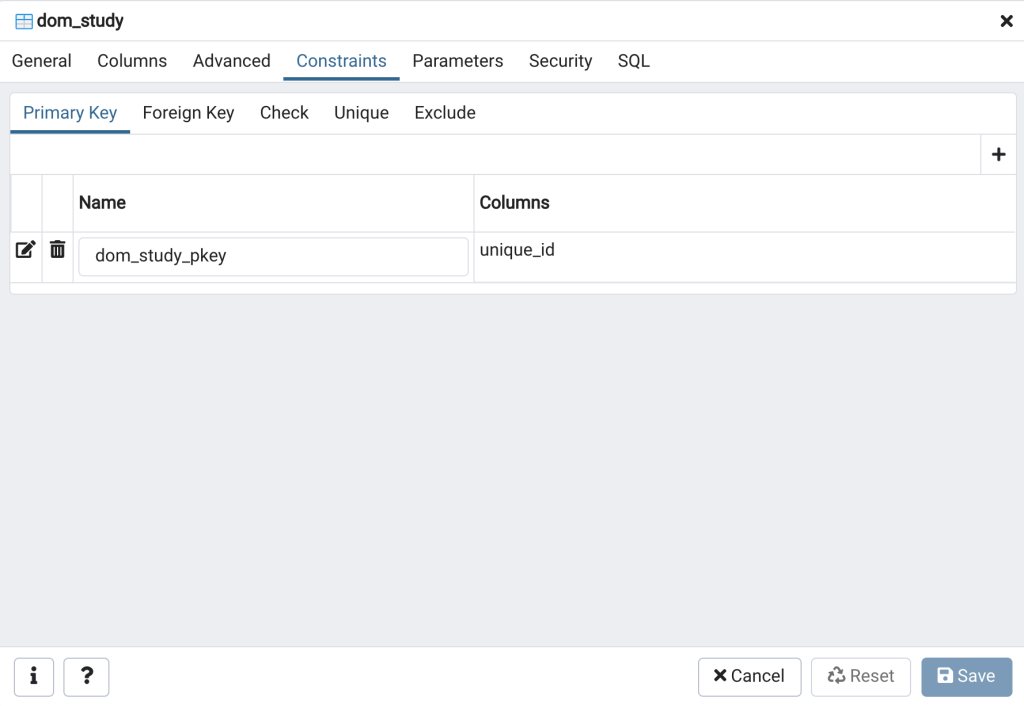
The table is set up with 2 constraints, a primary key constraint we are naming “dom_study_pkey” on the id field, and a unique constraint called “dom_study_data_value_ukey” on the value field. You can name constraints whatever you like, however here I’ve adopted the convention to begin the constraint names with the name of the table, and end the name with abbreviation for the type of key (e.g., p = primary) followed by the word “key.” The idea here is to make it as easy as possible to look at the name of a constraint and understand what the intended purpose of the constraint. The second statement on lines 19-20 adds a description of the table as a comment.
The last part of the script on lines is the statement for assigning the ownership of the table to the user postgres. Did you notice in Figure 4 that the word “label” is highlighted in the color magenta? In fact there are a number of words that are highlighted this way, for instance CREATE, TABLE, NOT, and DEFAULT, among others. These words are highlighted because they are SQL keywords. Keywords are essentially words that have special meaning in the SQL language either because they are used as the name for an internal database object or as a SQL command. Keywords are either reserved or unreserved. The most important difference between the 2 is that reserved key words can’t be used as the name of a database object, while unreserved words can. PostgreSQL uses a slightly modified version of the 2016 SQL standard list of key words. You can view a list of the keywords and their reserved/unreserved designation in Appendix C of the PostgreSQL documentation, or by using the following select query in the pgAdmin Query tool. I’ll cover select queries in more detail in a future post.
SELECT *
FROM pg_get_keywords()
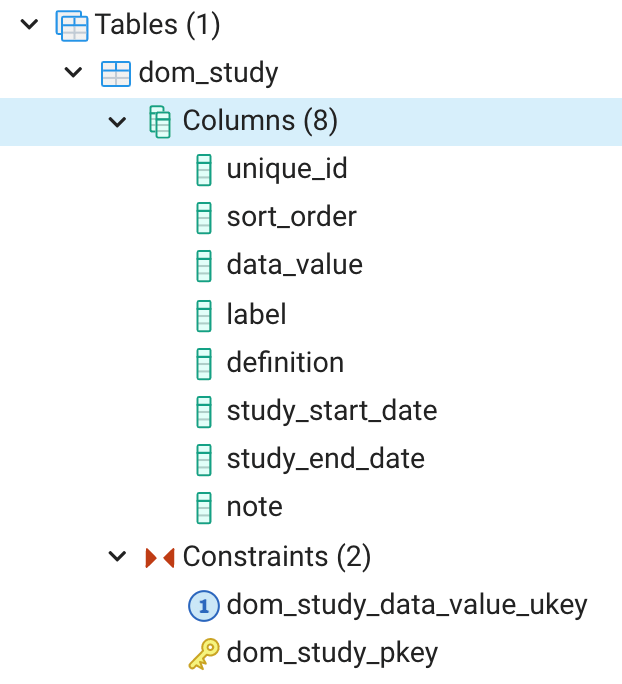
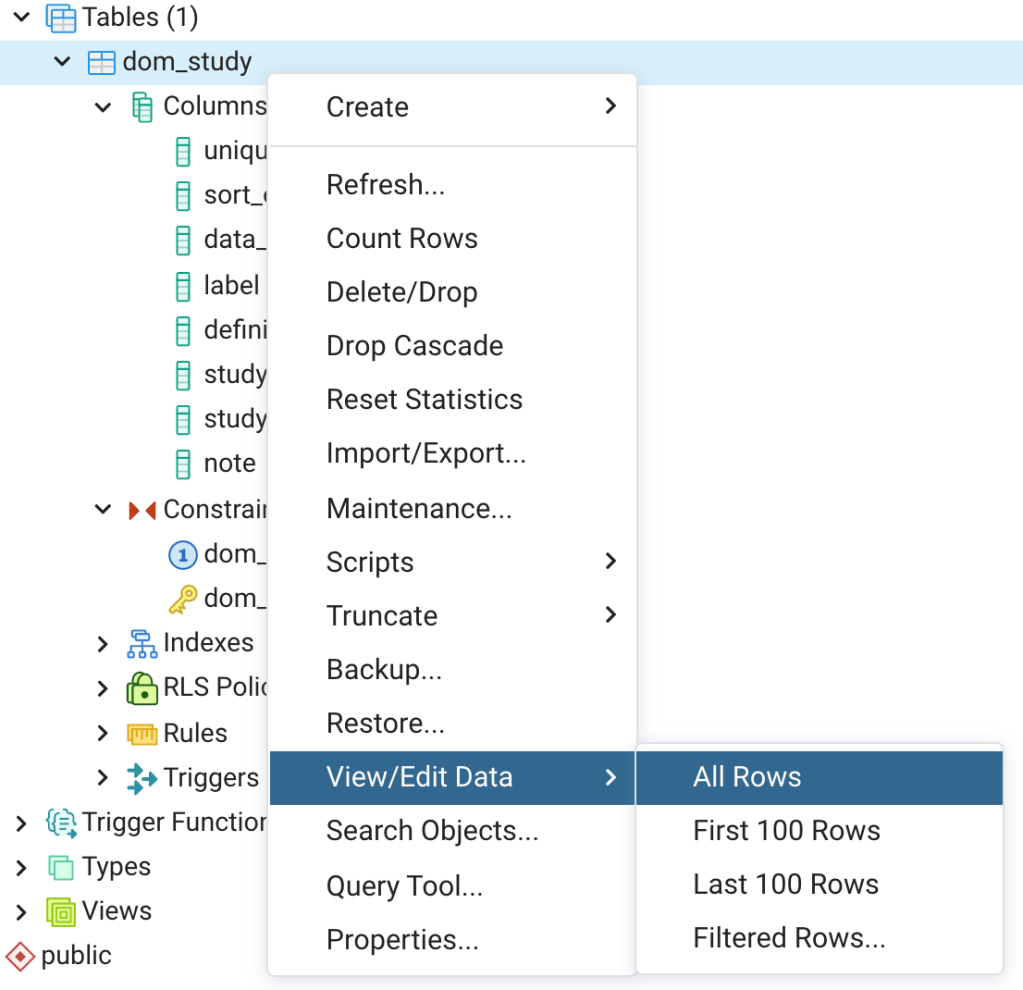
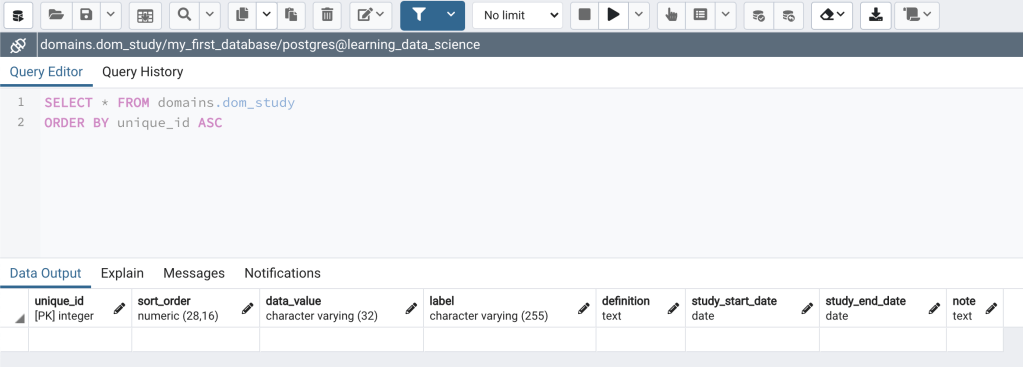
ORDER BY 1;Let’s now briefly explore the new dom_study table in pgAdmin. In pgAdmin, click on the columns and constraints nodes under the dom_study table (Figure 6). A listing of the columns and constraints will appear. Next right click on the dom_study table, and select “View/Edit Data” and then “All Rows” (Figure 7). The dom_study table will open in View/Edit Data mode (Figure 8, bottom pane). The table is presently empty as we have not yet inserted any data. In View/Edit mode you can manually enter and edit data, which is a fine way to go. However, we’ll see in later posts how INSERT and UPDATE statements can be used to add data to tables and edit data very efficiently.
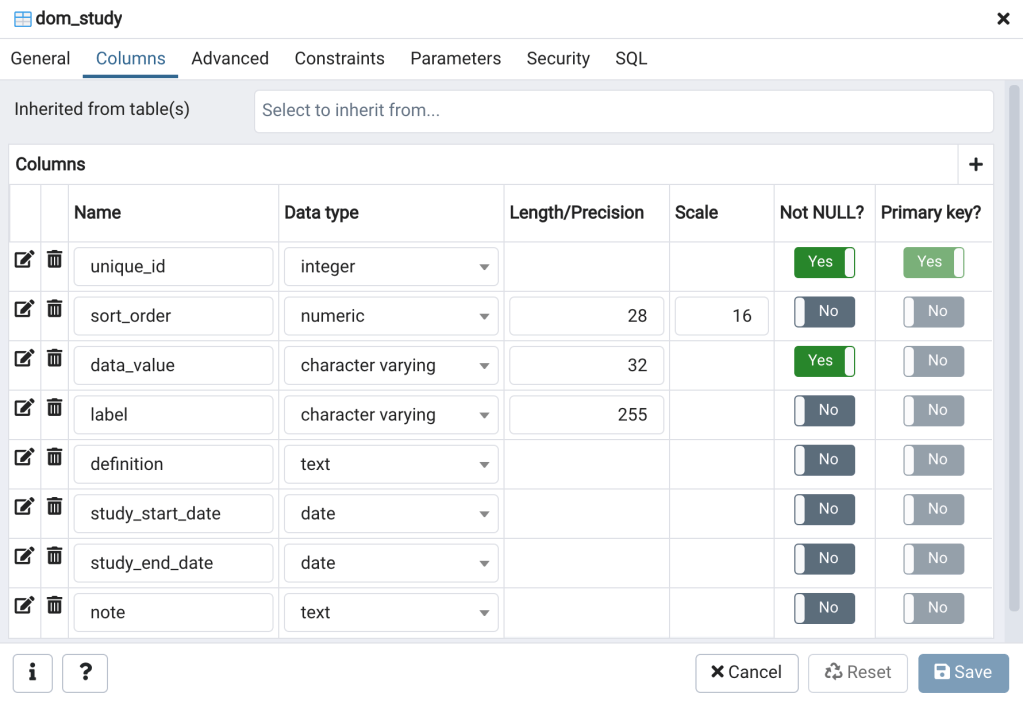
Next, right click on the dom_study table in the pgAdmin tree again and then select “Properties…”; the table properties window will open (Figure 9 top panes). The table properties window can be used to view and edit the table properties and settings. The table properties window includes several tabs. The general tab (Figure 9 upper left) includes the table name, owner, and comment. The columns tab (Figure 9 upper center) includes the column names, data types, and other information about the columns.
In the columns tab you can edit the properties of any column by clicking on the “edit row” button (i.e., pencil icon) on the far left side of each respective row. The constraints tab (Figure 9 upper right), as the name suggests, holds the information about the database constraints. For instance, the primary and unique keys that we created in the create table script.

Now that we’ve explored a little in pgAdmin next I’ll describe what data the columns are intended to store. Recall that the dom_study table is intended to store metadata about scientific studies, the data from which will be stored in other related tables in this database.
- unique_id is an auto-incrementing integer (i.e., a “serial” datatype) that will serve as a unique identifier for each row.
- sort_order has a numeric data type and will be used to enter the sort order for each data_value, for instance the order the values will appear in a report table. The third column.
- data_value is character varying with a maximum length of 32 characters and will be used to store the data values that will entered into the data tables.
- label is character varying with a max length of 255 characters and will be used to store the descriptive titles for each data value.
- definition is text and will be used to store the definition or description of each data value.
- study_start_date and study_end_date will be used to store the start and end dates of the study, respectively. For instance, the date the funding for the study became available (study_start_date), and the end date of the contract or grant that funded the study (study_end_date).
- note is a free-form text field that can be used to store notes (i.e., unstructured data) about each record in the table.
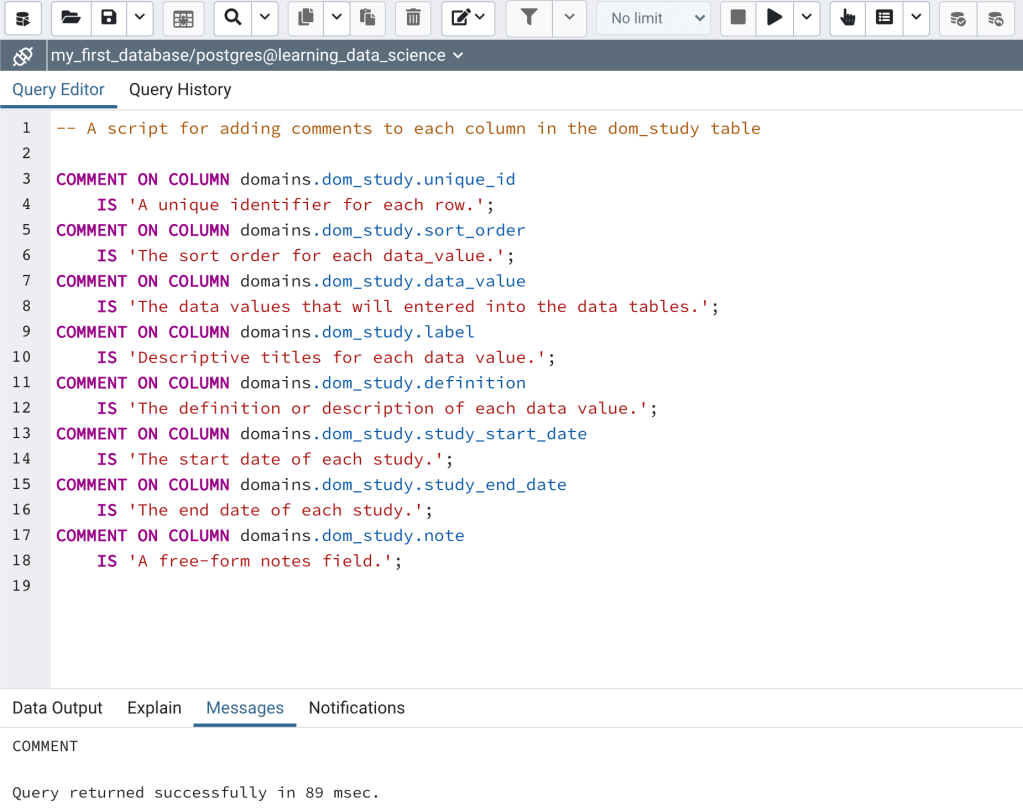
Wouldn’t it be nice is the descriptions of each column could somehow be stored in the database so that anyone who used the database had access to the column definitions? Well, we’re in luck because, as seen above for tables, PostgreSQL allows comments to be added columns too. Let’s now add the above descriptions to the columns using a SQL script. To add the column comments, first open the add_dom_study_comments.sql file under Lessons/Lesson_002 in your learning-data-science repository. Once the file is open hit the execute button to run the script (Figure 9). Existing comments on a column can be changed using the same SQL syntax used to initially add comments. Comments can also be added and edited by using the column properties dialog.
Pro Tip: Add comments to all database objects. The comments should describe each object succinctly and completely. Comments can be added and edited using SQL or by using the properties dialog tool for any object (e.g., Figure 8). Comments can be viewed using the properties dialog or they can be queried directly from the database. I’ll cover this in detail in a later post.
Recall that in SQL you can string together as many statements as you’d like into a single script so long as the statements are separated by semicolons. Thus, we could have included the SQL code from the add_dom_study_comments.sql script in the create_dom_study_tbl.sql script to begin with, for instance starting on line 21. This would have allowed us to run the create table script and column comments script all with one click of the Execute button.
Create – Table Tool
We just used SQL to create a new table. However, similar to the Create – Schema tool that we discussed in the previous post, pgAdmin has a tool for creating a new table. We won’t create another table here. However, below are instructions for using the Create – Table Dialog to create a table:

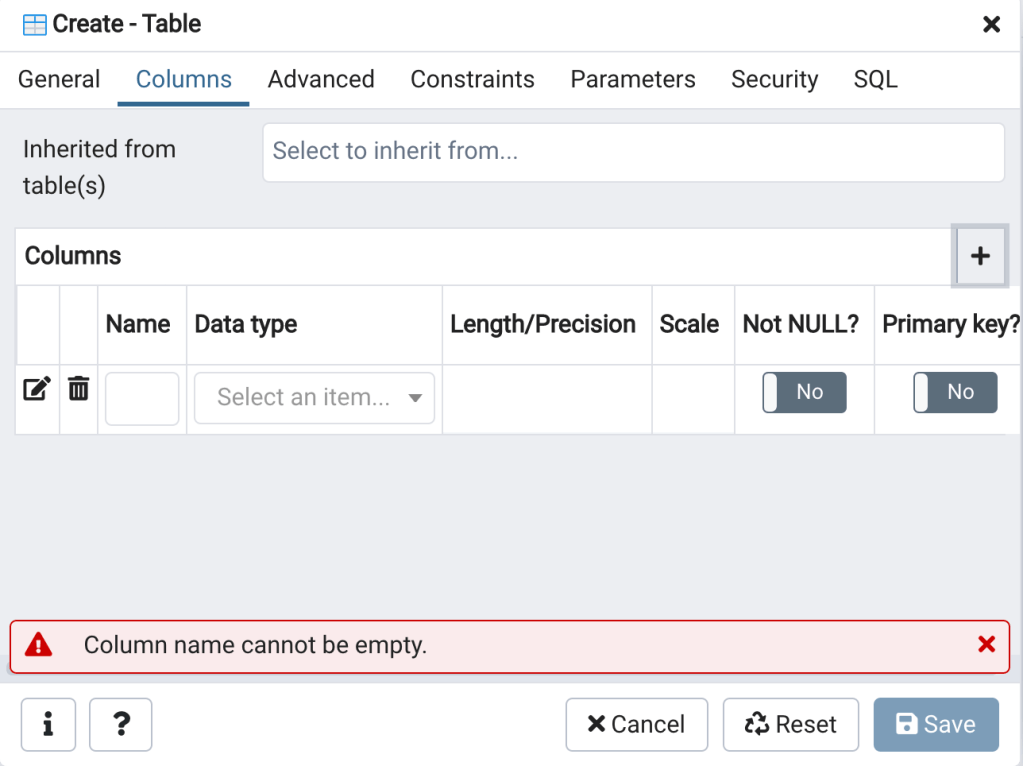
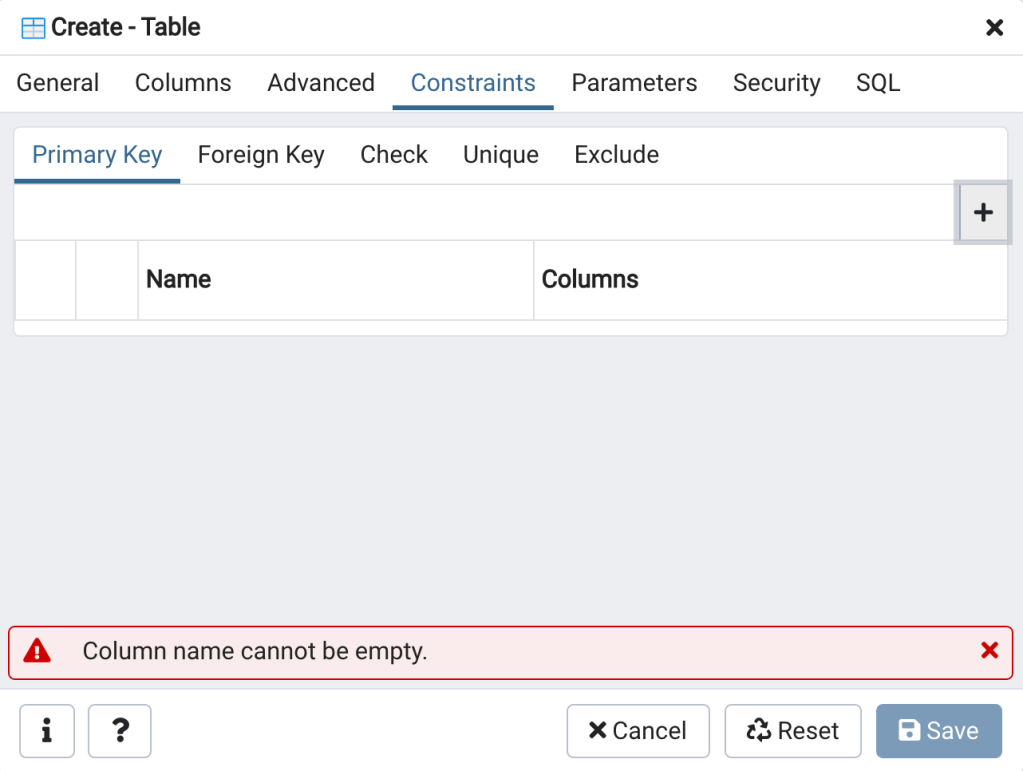
- In the domains schema, right click on Tables, then click on Create, and then on Table… (Figure 10). The Create – Table Dialog will open (Figure 11).
- To create a table, enter the necessary information into the General (Figure 11 left), Columns (Figure 11 center), and Constraints (Figure 11 right) table, then click Save.

Create Table Script Tool
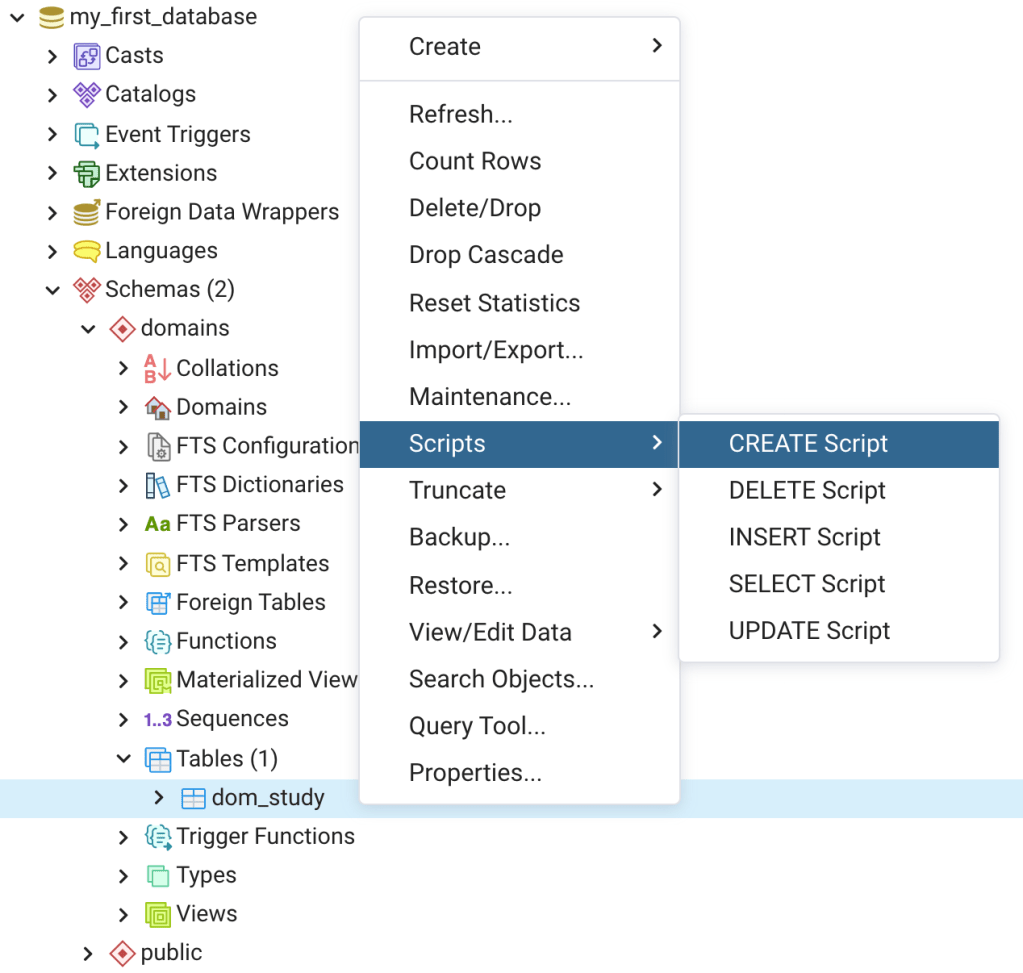
Now go to pgAdmin and navigate to and click on the schemas node in my_first_database. Click on the domains schema, then on Tables, and finally on dom_study (Figure 12, left side). On the right side of the screen click on the SQL tab. You should then see the SQL that was used to create the table (Figure 12, right side).

Next, right click on the dom_study table, and then click on “CREATE Script” (Figure 13). A query tool window will open with a SQL script for creating the dom_study table. This illustrates that the database stores the metadata for each database object, and can use that metadata to build SQL scripts. The create script tool is useful for learning SQL. For instance, you could use the Create – Table Dialog to create your first table, and then use the create script tool to see how you could use SQL to create the table. The create script tool is also a way to save time if you wanted to create another table with a similar layout, for instance another table in the domains schema. Just change the table name after “CREATE TABLE”, change the columns and constraints, and other pertinent information to make the script relevant to the new table you want to create, and hit execute.
Recommended Reading
As a supplement to this post, I encourage you to read the GitHub documentation on configuring a remote for a fork, syncing a fork, and pushing commits to a remote repository; and the PostgreSQL documentation on sequences, comments, and creating tables.
Next Time on Elfinwood Data Science Blog
In this post, we created a sequence and a table, and added comments to columns in a table all using SQL. We explored various ways to interact with a table in pgAdmin, and discussed using the create table dialog and create scripts for creating tables. In the next post we’ll insert data into the dom_study table and learn how to delete rows from a table.
If you like this post then please consider subscribing to this blog (see below) or following me on social media.If you’d like to follow this blog, but you don’t want to follow by subscribing through WordPress then a couple of options exist. You can “Like” the Elfinwood Data Science Blog Facebook Page or send me your email using the form on the Contacts Page and I’ll add you to the blog’s email list.
Follow My Blog
Copyright © 2021, Aaron Wells

3 thoughts on “Lesson 002: Creating Tables in PostgreSQL”