
Introduction
In the previous post I covered part 1 of SQL select statements. We looked at the Lesson_007 files in the learning-data-science GitHub repository to learn the basics of SQL select statements.
In this post, the second of 2 posts focused on SQL select statements, I cover LIMIT, OFFSET, mathematical operations, creating columns on the fly, data type casting, and column aliases.
Since data analysis and management are best learned by doing, the objective of this and future posts is to get readers hands on experience using PostgreSQL and R. This lesson builds on earlier posts so, if this is your first time reading this blog and you’d like to follow along on your computer, then please go back and start from the post Learning Data Science and work through the lessons up to this point.
Lesson 8 Video
Check out the accompanying video on the Elfinwood Data Science YouTube channel here: Elfinwood Data Science Blog Lesson 8 Video.
For this post we’ll refer to files in the Lesson 8 folder in the learning-data-science repository. If you have not already forked the learning-data-science repository, and cloned the fork to your computer, please do so now following the instructions provided in the post Learning Data Science. If you have previously forked and cloned the repository, but don’t have the files for this lesson, then follow the instructions here to update your fork with the latest files.
If you are not familiar with version control using Git and GitHub, I recommend going back and working through the hands on tutorials in my series on version control starting with “Version Control: An Overview.”
For the remainder of this post I’ll provide some examples of select statements to query data from my_first_database. For your reference, an annotated listing of these select statements is available in the Lesson_008 folder in the learning-data-science GitHub repository.
LIMIT and OFFSET
The LIMIT and OFFSET clauses are optional and allow the user to control the number of rows returned by a select statement. LIMIT is placed after ORDER BY in a select statement. In the LIMIT clause, the user provides an integer value indicating the number of rows to return. For instance, the following select statement returns the first 10 rows of the public.site table:
SELECT unique_id, study_value, sample_id, site_start_ts, slope_percent
FROM public.site
ORDER BY sample_id ASC
LIMIT 10;
Note that if zero is entered as the number of rows to return then no rows will be returned.
SQL Evaluation Order
So far we’ve learned about SELECT statements and have seen the various parts, including the SELECT command, and the FROM, WHERE, ORDER BY, and LIMIT clauses. The order in which the above parts of a select statement are evaluated is as follows:
- FROM: get the base data
- WHERE: filter the data
- SELECT: retrieve the filtered data
- ORDER BY: order the filtered data
- LIMIT: apply the row number criteria to the filtered and ordered data
When using LIMIT it’s critical to include an ORDER BY clause because the results of the LIMIT clause are dependent on the order in the which results are returned. This brings up an important point about SQL statements, which is that SQL statements are evaluated in a certain order, and the evaluation order influences the results that are returned. See the sidebar “SQL Evaluation Order” for more details. From this we can see that LIMIT is applied to the filtered and ordered results. Thus if LIMIT is used without ORDER BY then the results will be based on the default ordering of the table of interest which may or may not be what you are interested in.
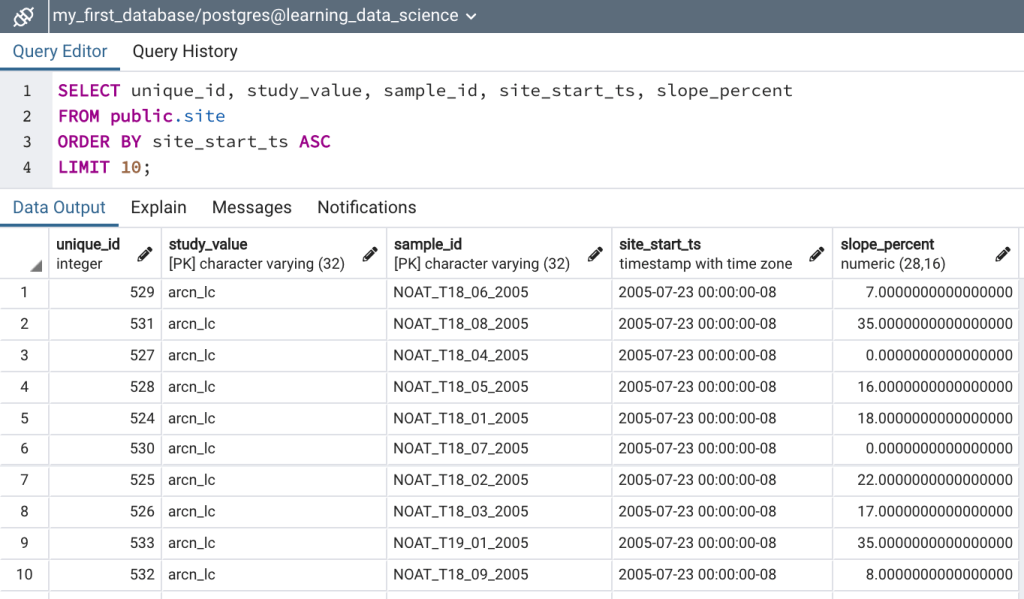
Note that in the above select statement the results are ordered by the sample_id column and 10 rows are specified in the LIMIT clause. The query will first sort the table by sample_id in ascending order and then will return the first 10 plots based on the alphabetical order of sample_id (Figure 1a). However, let’s say that you’re interested in seeing the first ten plots that were sampled based on the start time. To do this the results need to be returned in chronological order from earliest to latest (i.e. ascending order) based on the site_start_ts field. To do so simply order the results by site_start_ts as follows:
SELECT unique_id, study_value, sample_id, site_start_ts, slope_percent
FROM public.site
ORDER BY site_start_ts ASC
LIMIT 10;
See Figure 1b for the results of the above query. Alternatively, if you were interested in seeing the the plots with the steepest slope gradients then the results would be ordered by the slope_percent field in descending order as follows:
SELECT unique_id, study_value, sample_id, site_start_ts, slope_percent
FROM public.site
ORDER BY slope_percent DESC, sample_id ASC
LIMIT 10;
See Figure 1c for the results of the above query. Note that in the above select statement that the results are also ordered by sample_id in ascending order. This was included to specify how to handle the ordering of the results in the event that more than one plot has the same slope_percent value.


OFFSET is used with LIMIT to specify the number of rows that are skipped before the LIMIT clause takes effect. For instance, the following select statement will return 10 rows starting from the 6th row (i.e., the first 5 rows are skipped) ordered by slope_percent (Figure 2):
SELECT unique_id, study_value, sample_id, site_start_ts, slope_percent
FROM public.site
ORDER BY slope_percent DESC, sample_id ASC
LIMIT 10 OFFSET 5;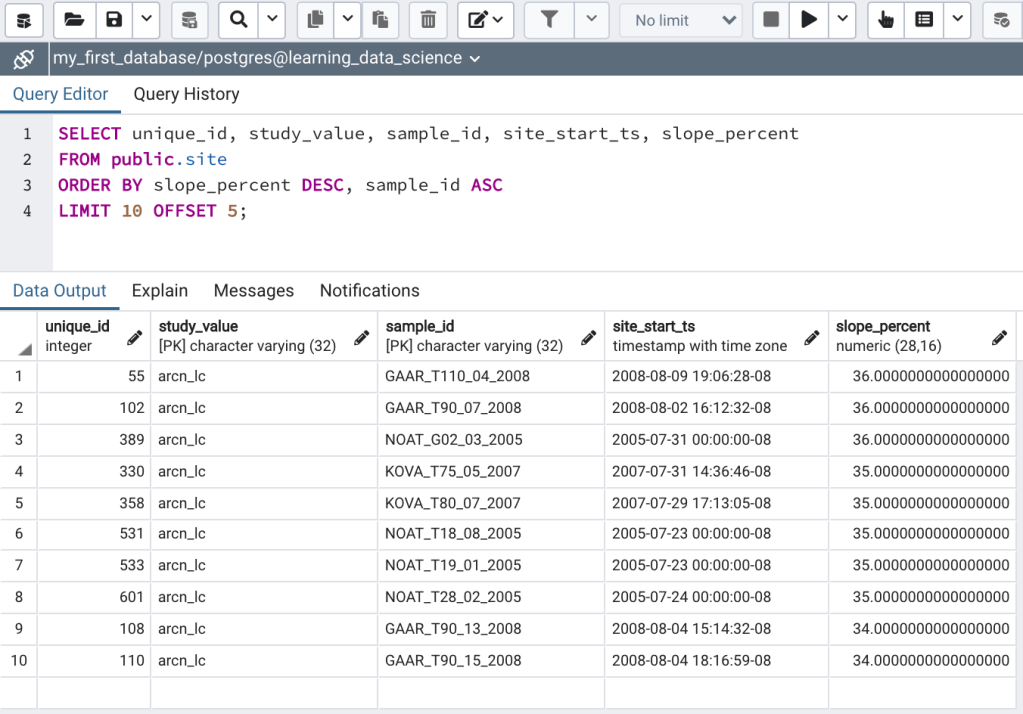
Column Aliases
Column aliases are temporary column names assigned as part of a select statement. Aliases can be useful for a variety of applications, including shortening the length of SQL statements, providing more meaningful column names in query output, and assigning names to columns created on-the-fly (see “Create columns using Select”, below). Let’s look at a couple of examples to illustrate the utility of column aliases.
The SQL keyword AS can be used to assign column aliases. For instance, in the following select statement the site_start_ts column is given an alias of st.
SELECT study_value, sample_id, site_start_ts AS st
FROM public.site
ORDER BY site_start_ts ASC
LIMIT 10;
In the above example an abbreviation (“st”) of the actual column name is used as the alias (Figure 3a). Using aliases to shorten and simplify column names is a common use of aliases and can help shorten long, complex SQL statements and reduce typing. Note that the full column name is used in the ORDER BY clause and not the alias. This is because in SQL statements aliases are evaluated after ORDER BY.
When assigning aliases the AS keyword is optional. Hence, the above statement can be written more succinctly as follows:
SELECT study_value, sample_id, site_start_ts st
FROM public.site
ORDER BY site_start_ts ASC
LIMIT 10;
The results of the above query will look the same as the results in Figure 3a. Aliases are also commonly used to provide more meaningful column names in query output. This feature of aliases is useful because it allows you to use column names in your database tables that are succinct and that follow the best practices for database objects, while allowing for flexibility in the column names displayed in query output. For instance, if the results of a select statement will be exported from the database for use in a report table, then column aliases could be used to customize the column headings for the report table. For instance, in the following select statement the sample_id and site_start_ts columns are assigned the aliases Sample ID and Plot Start Time.
SELECT sample_id AS "Sample ID", site_start_ts AS "Plot Start Time"
FROM public.site
ORDER BY site_start_ts ASC
LIMIT 10;
Figure 3b shows the results of the above query. Note that aliases need to be surrounded in double quotes if spaces are used, aliases start with a number, and/or if you want the alias to include capital letters in the output.


Data Type Casting
Data type casting is a means by which to temporarily change the data type of an existing column in the output of a select statement. Casting can also be used to assign a data type to a column that is created on-the-fly (see “Create columns using Select”, below). For reference, data types were covered in Lesson 002 of this blog.
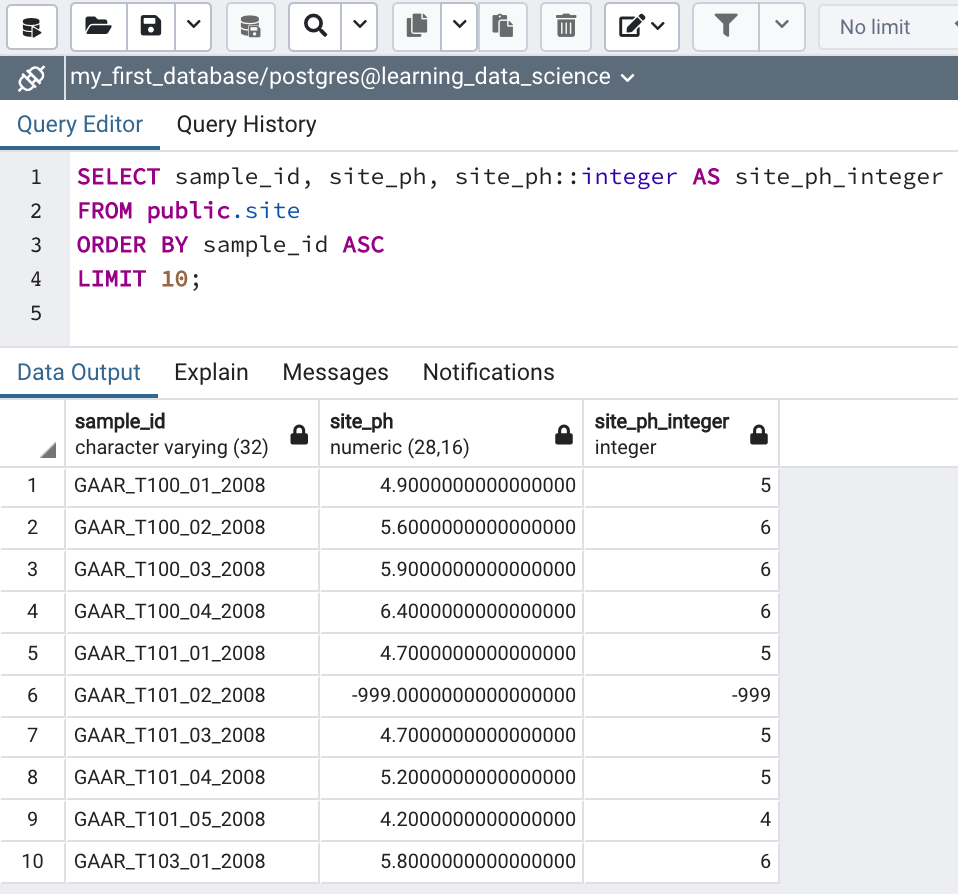
To cast a column to another data type in a select statement simply type the column name followed by two colons (the cast operator) followed by the data type to which you want to cast the column. For instance, in the following query the site_ph column is selected twice. The first time it’s selected in its predetermined data type, numeric(28,16), and the second time it’s cast to an integer data type.
SELECT sample_id, site_ph, site_ph::integer AS site_ph_integer
FROM public.site
ORDER BY sample_id ASC
LIMIT 10;
Note that by casting a numeric data type to an integer the results are rounded to the nearest integer (Figure 4a).
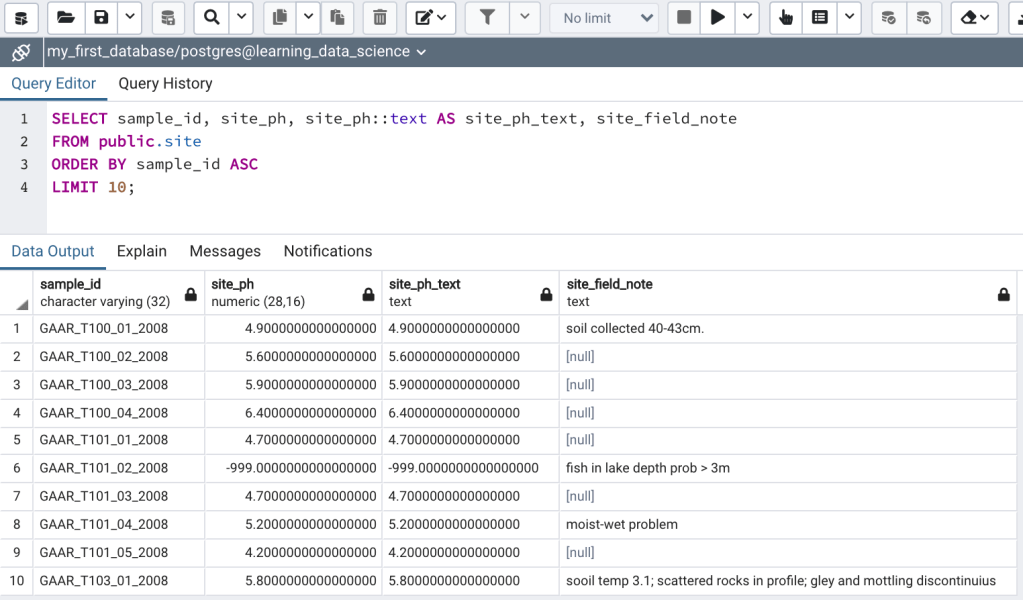

Casting only works if the data in a column is compatible with a certain data type. So, the following select statement is valid because a numeric data type can be cast to a text data type (Figure 4b):
SELECT sample_id, site_ph, site_ph::text AS site_ph_text, site_field_note
FROM public.site
ORDER BY sample_id ASC
LIMIT 10;
However, the following select statement fails because a text data type can’t be cast to a numeric data type unless the data in the text column contains only numbers, which is not the case for this example (Figure 4c).
SELECT sample_id, site_ph, site_ph::text AS site_ph_integer, site_field_note::numeric(28,16)
FROM public.site
ORDER BY sample_id ASC
LIMIT 10;
Creating Columns using Select
One the interesting features of the SELECT command is that it can used to create columns on-the-fly with or without specifying a table expression using FROM. A couple of examples are below:
Creating a text column on-the-fly without specifying a table expression:
SELECT 'I just created this column'::text AS new_columnIn the above select statement I’ve created a text column called “new_column” with the data element matching the expression between single quotes (Figure 5a).
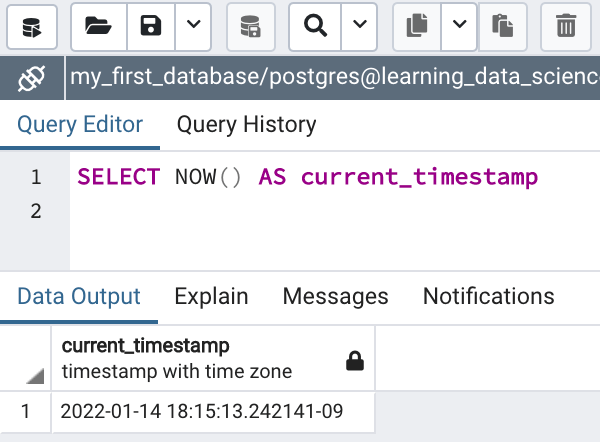
Creating a timestamp column displaying the current system date and time without specifying a table expression:
SELECT NOW() AS current_timestampIn the above statement I created a timestamp with time zone column called “current_timestamp” using the NOW() function (Figure 5b). I’ll cover PostgreSQL date/time functions in more detail in a future post.

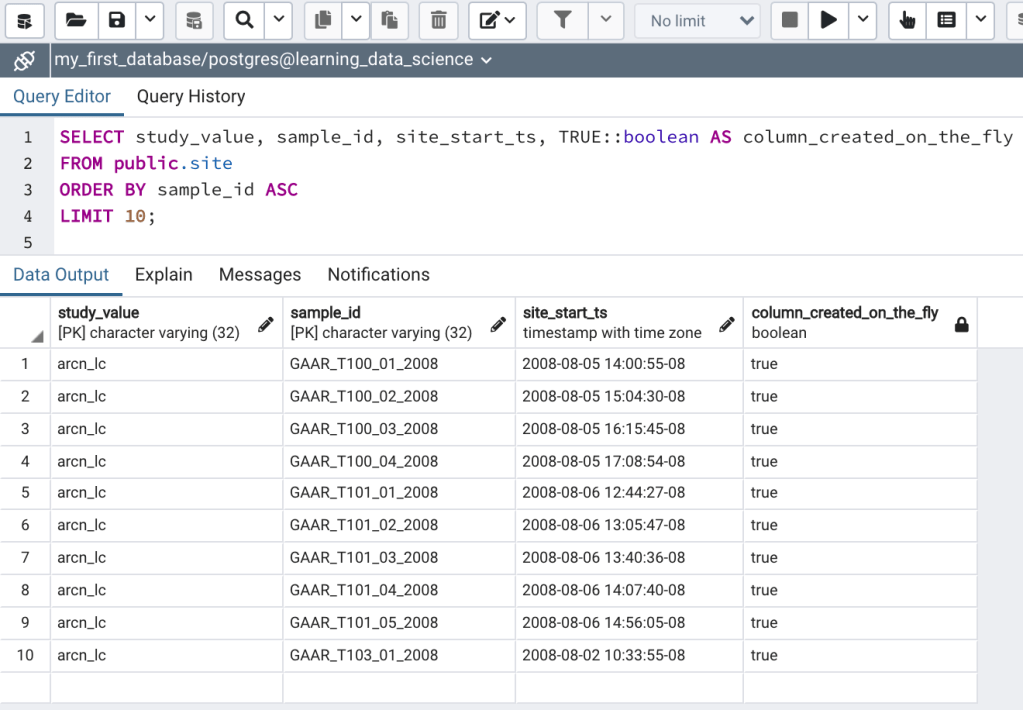
Creating a column on-the-fly with a table expression:
SELECT study_value, sample_id, site_start_ts, TRUE::boolean AS column_created_on_the_fly
FROM public.site
ORDER BY sample_id ASC
LIMIT 10;
In the above statement I select several columns from the public.site table and created a boolean column called “column_created_on_the_fly” and assigned the value TRUE (Figure 5c). Notice that the value in the “column_created_on_the_fly” column is repeated for all of the rows returned.
Mathematical Operations using Select
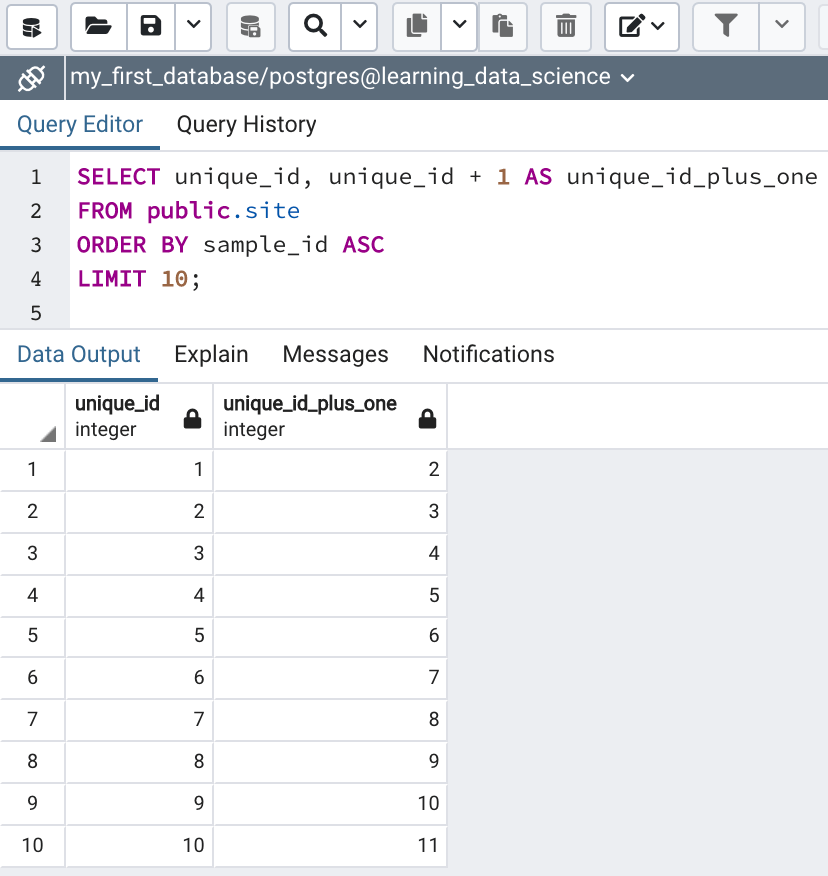
Another handy feature of SQL is that mathematical operations can be performed on columns and between columns, the results of which are returned in a new column created on-the-fly. For example, in the following statement I’ve selected the unique_id column and the unique_id column plus 1 to create a new column called “unique_id_plus_one.”
SELECT unique_id, unique_id + 1 AS unique_id_plus_one
FROM public.site
ORDER BY sample_id ASC
LIMIT 10;
The addition is performed on each row. Notice in the results (Figure 6a) that the data type of the new column is integer, the same as the original unique_id column, this is because the result of integer addition is an integer and PostgreSQL intuits this.
Similarly, multiplying the unique_id column by a decimal value results in a default data type in the new column of numeric:
SELECT unique_id, unique_id * 1.543 AS unique_id_plus_one
FROM public.site
ORDER BY sample_id ASC
LIMIT 10;
The number of significant digits in the result is dictated by the number of significant digits in the multiplier (Figure 6b).

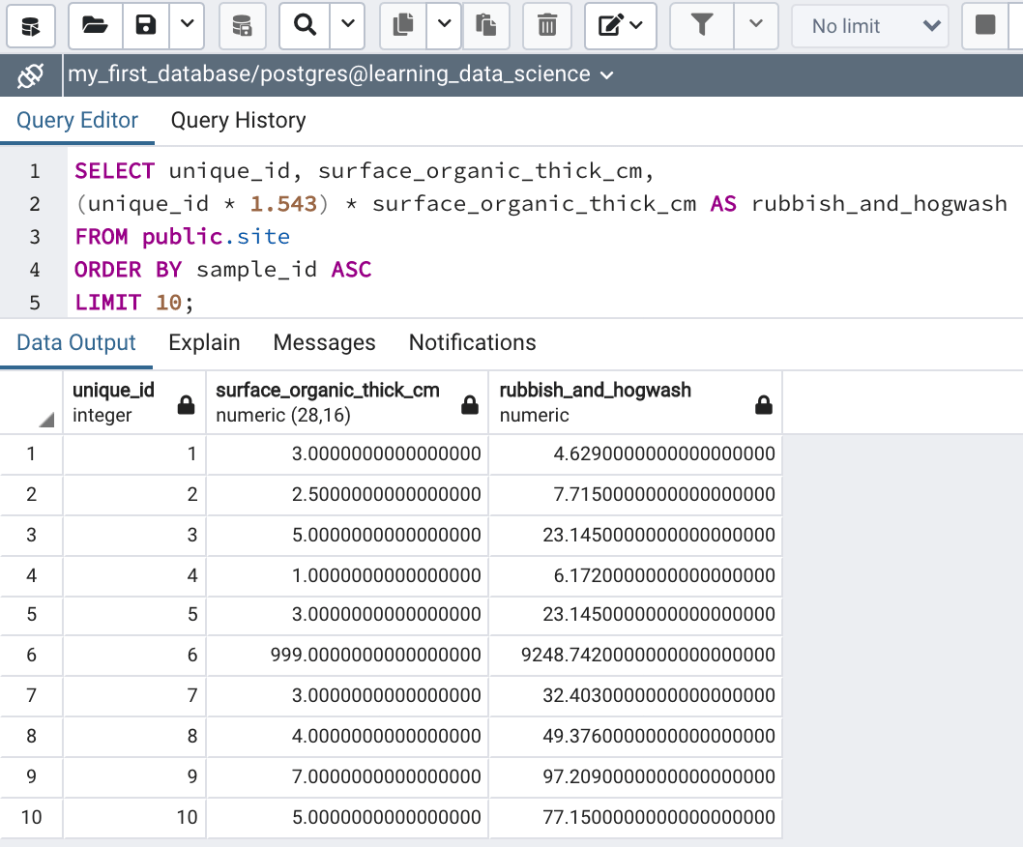
Lastly, here’s an example of performing math between 2 columns:
SELECT unique_id, surface_organic_thick_cm, (unique_id * 1.543) * surface_organic_thick_cm AS rubbish_and_hogwash
FROM public.site
ORDER BY sample_id ASC
LIMIT 10;
In the above select statement I’ve multiplied unique_id by 1.543 and multiplied the product of that operation by the surface_organic_thick_cm column and the results are returned in a new column called “rubbish_and_hogwash”. The results of this operation are meaningless outside of this example, hence the humorous column name.
Recommended Reading
As a supplement to this post, I encourage you to read the PostgreSQL Tutorial on casting: Using PostgreSQL CAST To Convert a Value of One Type to Another
Next Time on Elfinwood Data Science Blog
In this post, the second of 2 posts focused on SQL select statements we covered LIMIT, OFFSET, mathematical operations, creating columns on the fly, data type casting, and column aliases. In the next post I’ll cover filtering data in select statements in more detail.
Please support this blog
This blog is provided free of charge and free of advertisements. The best way to provide support is to follow this blog and share it with a friend. Several options exist for following this blog.
- If you like this post then please consider subscribing to this blog (see below) or following me on social media.
- If you’d like to follow this blog, but you don’t want to follow by subscribing through WordPress then a couple of options exist:
- You can “Like” the Elfinwood Data Science Blog Facebook Page
- Send me your email using the form on the Contacts Page and I’ll add you to the blog’s email list.
- Lastly, subscribe to our YouTube channel and watch the latest lesson videos here: Elfinwood Ecology YouTube Channel
Follow My Blog
Copyright © 2022, Aaron Wells
