
Introduction
In the previous post I covered reverting and viewing differences in Git. In this post, the last in a 5 part series on version control, I’ll be instructing readers in using branches and merging in Git. Since version control and data management are best learned by doing, the objective of this and future posts is to get readers hands on experience with using version control and managing data using PostgreSQL.
For this and future posts we are going to use git on the command line, meaning using the terminal in Mac OS and Git Bash in Windows. To open up a command line window click here, and follow the instructions.
Branching
Thus far we have been working in a very linear fashion in Git: edit a file in a local repository, and then stage, commit, and push those changes. Reverting is also linear in its own way in that a revert takes you to an earlier snapshot along the same trajectory. Branching breaks down this nice linear trajectory in Git, and introduces the concept of alternative trajectories. Branching means you diverge from the main line of development and continue to do work without messing with that main line (Chacon and Straub 2020).

In nature branches are typically continuously divergent in a fractal-like pattern of increasingly smaller branches. We see this in the branches of many woody plants, and also in the branches of tidal guts (Figure 2).
Branching means you diverge from the main line of development and continue to do work without messing with that main line.
Chacon and Straub 2020

In Git, branches are divergent, but are also often convergent. This is because the changes you make in a branch you may want to eventually introduce back into the Master branch. In this way branches in Git are perhaps more similar to a hiking trail that splits into two trails, which eventually merge back together. Unbeknownst to you we have been working in a branch, the “Master” branch, this entire time. The Master branch is the default branch in Git and it is created behind the scenes at the time that you clone or create a repository.
Here I’ll provide a basic overview of branches, including why and when you might use them, and how to create and work in a branch. For detailed information, I highly recommend you spend some time reviewing a series of helpful diagrams and reading the detailed description of branching provided in in Chapter 3.1 of Pro Git.
Why and When to use Branches?
Why should you use branches? That’s a good question because, as we’ve learned thus far, by simply using a single branch (the Master branch) Git allows you to walk back your repository to a previous snapshot using “git revert.” So, if you were to make changes to a file which introduced a bug, you could then revert to a previous version in the Master branch without the bug, and start over from there. This can be a fine way to go about using Git, particularly if you’re primarily using Git to manage files that aren’t being used in a public application, for instance to run a website or a mobile app, and/or you’re using Git by yourself. However, if the files you’re managing are public-facing and/or you’re working with a team to collaborate on files, using multiple branches can provide some important advantages.
Why should you consider using branches in the above scenarios? Simply put, you can work on your files, for instance adding a new feature to an app or fixing a bug in a webform, without messing with your public-facing files. Using the website example, let’s say you wanted to add a new page to your site, and you wanted to minimize the downtime on your site while you add this feature. In this scenario you could keep your website running using the files in the Master branch, create a branch in which you work on adding the page, test the code in the new branch until it’s working smoothly, and then integrate (“merge”) the new page code with the code in the Master branch.
Branches can also be used when working with a team. For instance, Developer A is the lead developer working on a website. Developer B is a junior developer assigned to develop a smaller distinct component of the website, for instance a new page for that site. Developer A could work in the master, while Developer B works in a branch to write the smaller component and test it until it’s good to go. At that point Developer B would submit a “merge request” (more on merging below), and Developer A would review the files in the branch, and if they approve, would then merge the branch into the Master.
How do Software Developers use Branches in Practice?
I asked Sam Vanderwaal, software developer at ABR, Inc.—Environmental Research & Services, about when and how he uses branches. Here’s what Sam had to say:
“Personally, I almost always use at least two branches in all my repos, even personal projects: master/main and develop. The idea is to ensure that the main branch always has production-ready code, and typically every commit on it is a tagged release: v0.1, v1.0, v2.1, etc. The develop branch is then used as a staging area for incorporating new features and testing code before merging into main and making a new release. I develop new features on develop or specific feature-branches which are forked off of develop.
This is roughly the Gitflow approach though that model gets more complicated with specific feature branches, release branches, hot fixes, etc. Following the full Gitflow pattern might make a lot of sense for a large software company that deploys code to thousands of users but it also has a fair amount of overhead to it. I’ve found that you can get most of the benefit with less overhead by following it a little more loosely but ensuring you have at least the two branches main and develop. This also aids in collaborating with other developers as you can be working on individual feature branches which are then merged into develop.
This certainly isn’t the only way to do it; there are lots of other approaches out there. There are lots of people who primarily use a single branch and part of the beauty of git is you can easily checkout a previous commit if you break your code on the main branch so strictly speaking you don’t even need a develop branch. I just tend to prefer it for the organization, separation of concerns and aesthetics. “
Creating and Working with Branches
Now that we know what branches are, and the reasons why branches are useful, let’s now give branches a try. First, let’s create a new branch in the local HelloWorld repository, and switch to that branch. In the terminal enter the following and hit Enter:
Creating branches in GitHub: You can also create branches directly in GitHub. Click here to read all about how to do it.
git branch my-first-branchYou will not receive a message, which is normal. Now let’s check to see what branches exist in the local repository. Run the following command in the terminal:
git branchYou should see a list of the available branches with an asterisk next to the master branch (as below) indicating that is the branch you are currently working in (the active branch).
 *master
  my-first-branch
Now let’s switch to my-first-branch so that we can begin working in it. Type the following into the terminal and hit Enter:
git checkout my-first-branchYou should see the following returned:
Switched to branch 'my-first-branch'Now run the “git branch” command in the terminal. You should see the following indicating that my-first-branch is now the active branch:
 master
*my-first-branch
Now we’ll make a change to README.md; specifically let’s add a subheading with some text below it. Open README.md and edit it so that it looks like the text in Figure 9. Then save and close the file.

Now check the status. You should see something like the following:
On branch my-first-branch
 Changes not staged for commit:
   (use "git add …" to update what will be committed)
   (use "git checkout -- …" to discard changes in working directory)
 modified:   README.md
 no changes added to commit (use "git add" and/or "git commit -a")
Look familiar? That’s because it’s a message you’ve seen before when you have changes that are unstaged, with the exception that the first line says “On branch my-first-branch.” Go ahead and add and commit the changes. Please use the following commit message:
git commit -m "revised README.md in my-first-branch, added a subsection"Now let’s push the changes. Type “git push” into the terminal and hit Enter. You will likely see the following message:
fatal: The current branch my-first-branch has no upstream branch.
To push the current branch and set the remote as upstream, use

     git push --set-upstream origin my-first-branch
As the message indicates, the remote repository on GitHub has no branched called “my-first-branch” and therefore Git doesn’t know where to push the changes to. Luckily Git provides a solution to this problem using git push –set-upstream. Go ahead and copy the following line of code into the terminal and hit enter:
git push --set-upstream origin my-first-branchYou should see a message similar to below returned.
Counting objects: 3, done.
 Delta compression using up to 4 threads.
 Compressing objects: 100% (3/3), done.
 Writing objects: 100% (3/3), 470 bytes | 470.00 KiB/s, done.
 Total 3 (delta 0), reused 0 (delta 0)
 remote:
 remote: Create a pull request for 'my-first-branch' on GitHub by visiting:
 remote:      https://github.com/elfinwood-data-sci/HelloWorld/pull/new/my-first-branch
 remote:
 To https://github.com/elfinwood-data-sci/HelloWorld.git
 *[new branch]      my-first-branch -> my-first-branch
 Branch my-first-branch set up to track remote branch my-first-branch from origin.
Let’s walk through this message. The first few lines look a lot like a typical push message. The next few lines that begin with “remote:” are telling you to go to your repository on GitHub and create a pull request, which will create a new branch in the remote repository and pull in the files from the local branch. The last line indicates that you were successful in setting up a remote branch called my-first-branch that you can push to from my-first-branch in your local repository.
Next, log into Github and go the HelloWorld repository. You should see a message at the top of the main page that has a button that says “Compare & pull request” (Figure 4). This is the result of your recent push from your remote repository. Leave that as is for now, we’ll come back to this later. Instead, click on where it says “2 branches” (Figure 4, red arrow).

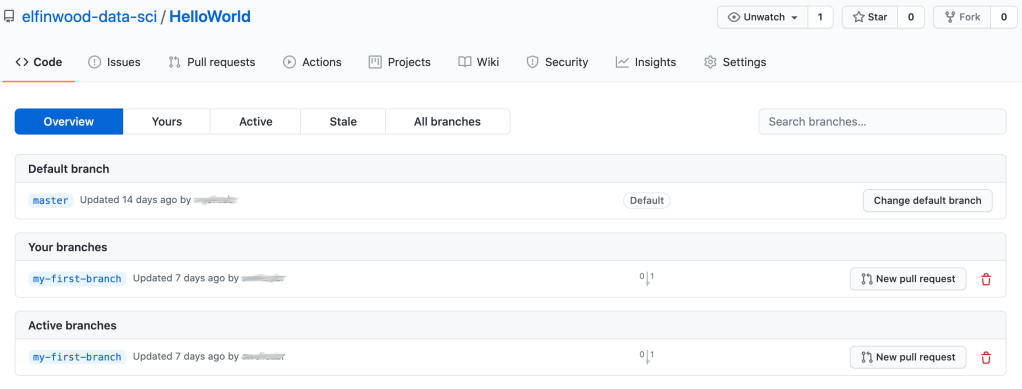
This will take you to the branches page (Figure 5) where you can see the different branches that you have in the repository, which is currently your default branch (i.e., Master) and the currently active branch (i.e., my-first-branch). There are also options for changing the default branch, deleting branches, and a new pull request (more on this later).
This illustrates what happens when you create a branch locally, commit changes, and push those changes to GitHub. We’ll come back to GitHub later on when I discuss merging. Now go back to your terminal and check the commit history, but typing the following and hitting Enter:
git log --pretty=onelineThe result should look something like this:
b039d2cc22d9e2c40f6dc09c89a351b03f1ef97e (HEAD -> my-first-branch, origin/my-first-branch) revised README.md in my-first-branch, added a subsection
 151599d9ef4835948e61a38ecf5537d8b18cdb10 (origin/master, origin/HEAD, master) again added a second sentence to READMD.md
 290adad86a5749860fd0455a01f4fd2da65ddb4d Revert "added a second sentence to README.md"
 a6d01fd93e487cec29165018be92a9d615bf2360 Updated new_file.txt, added a new sentence.
 c8646b1d9e406170ad4a601b5e34f18807b9a719 added new_file.txt, initial commit
 1c51bd0af43c7aa5b26dbc320d6b49a03371e702 added a second sentence to README.md
 e122fb022d1da68a834f3312ecc1adccf66b0f95 Initial commit
The latest commit is the one that you made on my-first-branch as indicated by the preceding “(HEAD -> my-first-branch, origin/my-first-branch)”, while the other commits are the same as the latest commit history in the master branch that we saw in the previous post.
OK, we’ve now done some worked in a branch, let’s see what’s happening in the master branch. Switch back to the master branch by typing the following into the terminal and hitting Enter:
git checkout masterYou should see the following:
Switched to branch 'master'
Your branch is up-to-date with 'origin/master'.
Next open README.md. You’ll see that the second section isn’t there and README.md looks like Figure 1. Next, check the commit history using “git log –pretty=oneline”. You’ll see that the last commit was the one with the message “(HEAD -> master, origin/master, origin/HEAD) again added a second sentence to READMD.md.” Now switch back to my-first-branch using the following command in the terminal:
git checkout my-first-branchYou should see the following:
Switched to branch 'my-first-branch'
Your branch is up-to-date with 'origin/my-first-branch'.
Now check README.md again. You’ll see the second section is there as in Figure 3. And finally, check the commit history again. You’ll see that the last commit is the one with the message “(HEAD -> my-first-branch, origin/my-first-branch) revised README.md in my-first-branch, added a subsection.” This illustrates that my-first-branch is a separate distinct workspace which has it’s own version of files and commit history.
The Basics of Merging
Merging in a Local Repository
Now, let’s say that you’re happy with the work you’ve done in my-first-branch, and that you want to incorporate that work into the master branch in your local repository. In Git the process of incorporating work from a branch back into the master branch is called “merging.” To merge, what you need to do is check out the branch that you want to merge into, in this case the master branch, and then run the “git merge” command.
Which branch am I on? To check which branch you’re on use the “git branch” command in the terminal. The branch with the asterisk next to it is the current branch.
Let’s try this. First, check out the master branch using the following command in the terminal:
git checkout masterThen run the following command to merge my-first-branch into the master branch.
git merge my-first-branchYou should see something similar to the following:
Updating 151599d..b039d2c
Fast-forward
  README.md | 3 +++
  1 file changed, 3 insertions(+)
Now check the status, you should see the following:
On branch master
Your branch is ahead of 'origin/master' by 1 commit.
   (use "git push" to publish your local commits)
This is a message we’ve seen before following a commit. It appears that merging also performs a commit. Check the commit history using “git log –pretty=oneline”. You should see that latest commit looks something like this:
b039d2cc22d9e2c40f6dc09c89a351b03f1ef97e (HEAD -> master, origin/my-first-branch, my-first-branch) revised README.md in my-first-branch, added a subsectionThe first part in parentheses indicates that master is now the current branch, and that the commit was merged from my-first-branch. The second part is the commit message from when the changes were first committed in my-first-branch. Now open README.md. You’ll see that the second section is now there as in Figure 3.
Next, push the changes to the remote repository, then go to the HelloWorld repository in GitHub and refresh your browser. You should see that README.md in the master branch has been updated to reflect the merge.
Merging in a Remote Repository
Merging can also be done in a remote repository like on GitHub. To illustrate this close README.md, and then switch back to my-first-branch using “git checkout my-first-branch”. Then open README.md and edit it to add another subsection as in Figure 6, and then save and close the file.

Now stage the changes using “git add README.md”, and then commit the changes using the following commit message “revised README.md in my-first-branch, added another subsection.” Finally, perform a push.
Next, go to the HelloWorld repository on gitHub and refresh your browser. The home page should look something like Figure 7 (without the red arrow).

You’ll see there is a green button for “Compare & pull request.” A Pull Request is a way to let collaborators know about the changes you’ve made before merging those changes into the Master branch.
Pull requests let you tell others about changes you’ve pushed to a branch in a repository on GitHub.
GitHub Docs
Click on the green Compare & Pull request button (Figure 7, red arrow). An “Open Pull Request Page” will open. The top part of the page will show the commit message from the last commit in my-first-branch (Figure 8).

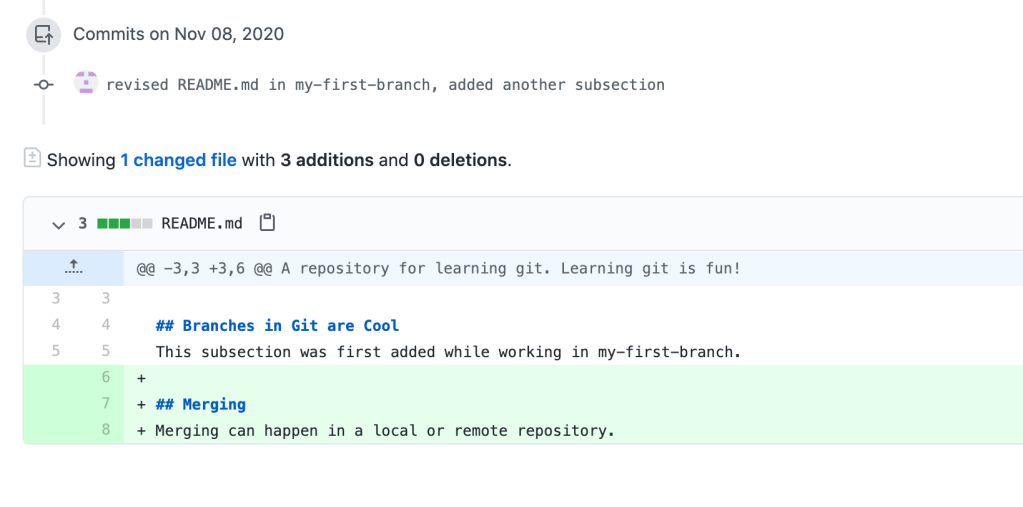
Scrolling down to the bottom part of the page will show the differences between README.md in the master and README.md in my-first-branch (Figure 9).
On the top part of the page you can add an optional comment that will be associated with your pull request. For this example we’ll skip the optional comment, but this can be a useful tool if you are working with a team in GitHub. Next, click on Create Pull Request (i.e., Figure 8, green button). You should see the merge pull request page (Figure 10).

Click the green “Merge pull request” button. The “Merge pull request” button will change to a “Confirm merge” button. Click on the “Confirm merge” to complete the merge. You should then see the successful merge request page, with a message indicating the merge was successful (Figure 11, green arrow).

There is also a “Delete branch” button that will delete my-first-branch directly in GitHub. Let’s not do that just yet. Instead at the top of the page click on the “<> Code” tab (Figure 11, red arrow). You should see that README.md in the master branch has been updated to reflect the merge.
Now, go back to the terminal, switch to the master branch using the “git checkout master” command, and perform a pull. You should see something like the following:
remote: Enumerating objects: 1, done.
 remote: Counting objects: 100% (1/1), done.
 remote: Total 1 (delta 0), reused 0 (delta 0), pack-reused 0
 Unpacking objects: 100% (1/1), done.
 From https://github.com/elfinwood-data-sci/HelloWorld
    b039d2c..6bf8452  master     -> origin/master
 Updating b039d2c..6bf8452
 Fast-forward
  README.md | 3 +++
  1 file changed, 3 insertions(+)
This indicates README.md has been update. Open README.md and you should see the second subsection as in Figure 6.
Deleting a Branch
We saw in the previous section that there is way to delete a branch in GitHub. You can also delete a branch in your local repository using the terminal. Why would you want to delete a branch? Well, you may want to delete a branch if you have no more use for it. For instance, now that the changes in my-first-branch have been merged with the master branch you could delete my-first-branch without losing any work. That may be of desirable if that branch has served its purpose and is no longer useful.
Note that deleting a branch locally will not delete it on the remote, instead you have to either delete the branch directly in GitHub (e.g., Delete branch button in Figure 11) or use a special line of code in the terminal. To delete my-first-branch locally enter the following code into the command line and hit Enter:
git branch -d my-first-branchYou should see a message similar to below:
Deleted branch my-first-branch (was 3efe7be).And if you list the branches in your repository using “git branch” then you will only see the master branch. To delete my-first-branch in the remote repository on GitHub from the command line use the following:
git push origin --delete my-first-branchYou should see a message similar to the following:
To https://github.com/elfinwood-data-sci/HelloWorld.git
 [deleted]         my-first-branch
Now go to the HelloWorld repository on GitHub and refresh the page. You should see that you now only have one branch.
Cloning vs. Branching vs. Forking
Thus far in this 5 part series on version control I’ve covered the concepts of cloning and branching. Forking is another version control concept that is similar to cloning. Here is a brief description of the similarities and differences between these 3 concepts.
Cloning: The process of creating a local working copy of a repository. A “clone” is directly related to the remote repository through the add->commit->push->pull cycle. Anyone can a clone a repository if the repository is public. However, pushing to a cloned repository requires that you have the proper permissions on that repository.
Forking: The process of creating a working copy directly on the remote end of things, for instance in GitHub or GitLab. Forking is similar to cloning. However, a “fork” is a separate, distinct, stand alone repository that is indirectly related to the original repository through the pull request and merge cycle. A fork can be taken in a completely different direction than the original repository without affecting the original repository. Forking does not require proper permissions on a repository. As such someone from the general public could create a fork of a public repository.
Branching: As discussed in this post, the process of creating a divergent development pathway within a repository. Branches can be created in both local and remote ends of a repository. Work done in a branch does not affect the master branch unless you or your development team specifically want to apply changes made in a branch to the master branch through the pull request and merge cycle. Branches are readily created and deleted, and thus are a quick and easy way to work on new features in your files, and test those features, before deciding to merge the new features into the master branch files.
Recommended Reading
As a supplement to this post, I encourage you to read Chapter 3 in Pro Git: Everything you need to know about Git. Also, read about the “GitHub Flow” and “GitLab Flow” to get some idea regarding branch workflows. Lastly, if you’re interested in learning more about advanced merging, read about merging conflicts from GitHub.
Next Time on Elfinwood Data Science Blog
In this post, the last in a 5 part series on version control, I covered branches and merging in Git. In the next post I’ll share a public GitHub project, learning-data-science, with readers which will include the code to begin building a PostgreSQL database. The files in the GitHub project will be used in future posts to instruct readers on how to manage data using PostgreSQL. The files and information presented in this blog will also be useful as a starting point for creating a database to manage your own data.
If you like this post then please consider subscribing to this blog (see below) or following me on social media.If you’d like to follow this blog, but you don’t want to follow by subscribing through WordPress then a couple of options exist. You can “Like” the Elfinwood Data Science Blog Facebook Page or send me your email using the form on the Contacts Page and I’ll add you to the blog’s email list.
Literature Cited
Chacon S. and B. Straub. 2020. Pro Git: Everything you need to know about Git. Version 2.1.264. Apress. New York, NY. 521 pp. Online here: https://git-scm.com/book/en/v2 (accessed 2020-09-26).
Follow My Blog
Copyright © 2020, Aaron Wells

One thought on “Version Control: Branches & Merging”