Introduction
In the previous post I presented a quick start guide for getting up and running with version control. In this post, the third in a 5 part series on version control, I’ll be instructing readers on managing files using Git and GitHub. Since version control and data management are best learned by doing, the objective of this and future posts is to get readers hands on experience with using version control and managing data using PostgreSQL. Future posts will build on this, so if you’re interested in using this blog as a learning tool then please follow along on your personal computer to get started.
Managing Files
At the end of the previous post I provided instructions for cloning the HelloWorld repository to your local machine. Now that you have the HelloWorld repository on your local machine, in this post I provide detailed instructions for managing files using a workflow that is commonly used in git: editing a file, staging those changes, committing the changes, and pushing the changes to a remote repository. Additionally, I’ll cover pulling from a remote repository. For this and future posts we are going to use git on the command line, meaning using the terminal in Mac OS and Git Bash in Windows. To open up a command line window do the following:
MacOS X
- Open Finder and navigate into the learning_data_science folder.
- Right click on the HelloWorld folder and then select “New Terminal at Folder”. A terminal window will open.
Windows
- In Windows Explorer navigate into the HelloWorld folder.
- Right click in the folder, and then click on “Git Bash Here”. A command line interface will open.
Staging Files
Files in Git are either tracked or untracked, meaning that Git either knows about them (tracked) or not (untracked). When a repository is first cloned to a local repository all the files are automatically tracked and, because the clone is an exact copy, the files are also unmodified relative to the remote repository. Chacon and Straub (2020) in Chapter 2.2 of Pro Git provide a helpful diagram (i.e., Figure 8) that illustrates the various statuses that a file can take on in Git. To check the status of the files in the repository type the following into the command line and then hit Enter:
git statusSince you just cloned the HelloWorld repository you should see the following returned:
On branch master
Your branch is up-to-date with 'origin/master'.

nothing to commit, working tree clean
Meaning that all the files in your repository are unmodified with respect to the files in the remote repository, and all files are being tracked.
Now, let’s say you want to update the readme file with additional information. Open the README.md file in a text editor, and make a small change, for instance, add a second sentence after the first (Figure 1). Then save and close the file. As a side note, the “.md” file extension stands for Markdown, which is a plain text formatting syntax.

Now go back to the terminal and check the status using the git status command. The result should look like this:
On branch master
Your branch is up-to-date with 'origin/master'.
Changes not staged for commit:
   (use "git add <file>..." to update what will be committed)
   (use "git checkout -- <file>..." to discard changes in working directory)

        modified:   README.md
Meaning that according to Git the files in the repository are still up to date with the remote repository…but how can that be since the README.md file was edited? This is because the changes to the README.md file have not been committed (see below, Committing). However, it’s obvious from the second part of the message that Git is aware that changes were made to the README.md file.
Git also provides us some helpful hints in the second part of the message, namely to use “git add <file>…” to update what will be committed, and “git checkout –<file>…” to discard changes in the working directory. In essence, the command “git checkout –<file>…” in this scenario is kind of like a “Rewind” button in Git. The command “git add <file>…” is like getting engaged to be married; you aren’t married yet, but you’ve taken an important step to show your intent.
Git Checkout
Now, let’s give it a try. Type the following into the command line and then hit Enter:
git checkout -- README.mdNext, check the status using “git status” and hit Enter. You should see the following:
On branch master
Your branch is up-to-date with 'origin/master'.

nothing to commit, working tree clean
The status is now changed. The message indicates that all files in your repository are unmodified with respect to the files in the remote repository, and all files are being tracked. Next, open README.md in a text editor. You should see that the second sentence is now gone.
Staging Modified Files
Open the README.md file and type in the second sentence again. Then save and close the file. Check the status using the git status command. The result should look like this:
On branch master
Your branch is up-to-date with 'origin/master'.

Changes not staged for commit:
   (use "git add <file>..." to update what will be committed)
   (use "git checkout -- <file>..." to discard changes in working directory)

     modified:   README.md
We’re right back where we started from. OK, let’s now try using “git add <file>…” to stage the changes to the README.md file. Type the following into the command line and then hit Enter:
git add README.mdNext, check the status. You should see the following:
On branch master
Your branch is up-to-date with 'origin/master'.

Changes to be committed:
   (use "git reset HEAD <file>..." to unstage)

     modified:   README.md
We can see that according to Git the files in the repository are still up to date with the remote repository. This is because the changes to the README.md file have still not been committed (see below, Committing). However, the second part of the message indicates that there are changes to be committed. Nice work! We have successfully staged our changes. Staged changes are placed in what is called the “staging area”, which is also referred to as the “index”. Git also provides a hint on how to go about unstaging changes using the “git reset HEAD <file>…” command.
OPTIONAL EXERCISE: Use “git reset HEAD <file>…” to unstage the changes to the README.md file. Then check the status. Hint: if you complete this exercise and unstage README.md, then you’ll need to use the “git add” command to stage the file again.
Tracking New Files
The “git add” command is also used for tracking new files. To illustrate this let’s create a new plain text file called “new_file.txt” to the HelloWorld folder. Next, check the status. You should see the following:
On branch master
Your branch is up-to-date with 'origin/master'.

Changes to be committed:
   (use "git reset HEAD <file>..." to unstage)

     modified:   README.md

Untracked files:
   (use "git add <file>..." to include in what will be committed)

     new_file.txt
You can see that there is a new untracked file, new_file.txt. We’re now ready to commit the changes to the READMD.md file. For now we’ll leave the new_file.txt file as is until we’ve committed the changes to README.md.
Committing
Now that you have successfully staged the changes to README.md it’s time to commit those changes. When changes are committed in Git they are recorded by the system and assigned a unique identifier called a “commit hash.” If using “git add” to stage changes to files or new files is equivalent to getting engaged to be married, then committing those changes is equivalent to getting married. To commit the changes to README.md, type the following into the terminal:
git commit -m "added a second sentence to README.md"OK, let’s break this down. The command “git commit” is used to commit changes. The “-m” is used to add a message. The commit message is included between double quotes after “-m”. OK, now hit Enter. You should see a message similar to the following:
Commit Message Rule-of-Thumb: It’s generally a good idea to keep messages short. A good rule of thumb for length is <50 character.
[master 1c51bd0] added a second sentence to README.md
1 file changed, 1 insertion(+), 1 deletion(-)
And just like that you’ve done your first commit! Now check the status; you should see the following:
On branch master
Your branch is ahead of 'origin/master' by 1 commit.
  (use "git push" to publish your local commits)

Untracked files:
  (use "git add …" to include in what will be committed)

     new_file.txt
The above message is letting us know that the local branch of our repository is ahead of the remote repository (i.e., origin/master) by 1 commit. It also gives us a hint to use “git push” to publish our local commits. Publishing local commits simply means syncing the files and commit history in our local repository to our remote repository. We’ll hold off on pushing our commit for now and instead stage the new_file.txt file. To stage the file use the “git add” command by typing the following into the terminal and hitting Return.
git add new_file.txtNext, check the status. You should see the following:
Your branch is ahead of 'origin/master' by 1 commit.
  (use "git push" to publish your local commits)

Changes to be committed:
  (use "git reset HEAD …" to unstage)

     new file: new_file.txt
We can see that we’re still ahead of the remote repository (origin/master) by 1 commit, but now new_file.txt is staged. Next, commit new_file.txt.
git commit -m "added new_file.txt, initial commit"You should see something like this:
[master c8646b1] added new_file.txt, initial commit
 1 file changed, 0 insertions(+), 0 deletions(-)
 create mode 100644 new_file.txt
Then check the status. You should see the following.
On branch master
Your branch is ahead of 'origin/master' by 2 commits.
  (use "git push" to publish your local commits)

nothing to commit, working tree clean
We now see that we are ahead of the remote repository (origin/master) by the 2 commits we completed above, and that we have no other changes or new files to commit in our local repository.
Commit History
Before we push our commits let’s take a quick look at our commit history using the “git log” command. Type the following into the terminal and hit Enter.
git logYou should see a history of your commits, including the commit hashes, timestamps, and commit messages, similar to below:
commit c8646b1d9e406170ad4a601b5e34f18807b9a719 (HEAD -> master, origin/master, origin/HEAD)
Author: elfinwood-data-sci
Date: Thu Oct 8 20:22:41 2020 -0800

     added new_file.txt, initial commit

commit 1c51bd0af43c7aa5b26dbc320d6b49a03371e702
Author: elfinwood-data-sci
Date: Thu Oct 8 19:57:50 2020 -0800

     added a second sentence to README.md

commit e122fb022d1da68a834f3312ecc1adccf66b0f95
Author: elfinwood-data-sci
Date: Mon Sep 28 07:13:33 2020 -0800

     Initial commit
You can view a streamlined version of the commit history using the following command:
git log --pretty=onelineThis results in a shortened version of the commit history with only the commit hashes and messages:
c8646b1d9e406170ad4a601b5e34f18807b9a719 (HEAD -> master, origin/master, origin/HEAD) added new_file.txt, initial commit
1c51bd0af43c7aa5b26dbc320d6b49a03371e702 added a second sentence to README.md
e122fb022d1da68a834f3312ecc1adccf66b0f95 Initial commit
Next, we’ll push our commits to the remote repository.
Pushing
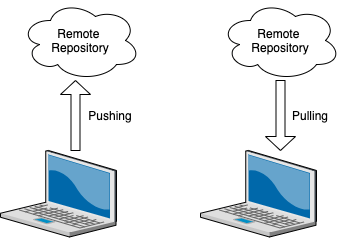
Now that we’ve made some commits we need to sync our files and commit history with the remote repository. This process of syncing our remote with the local repository is called “Pushing” (Figure 2).
To push our commits to the remote, type the following into the terminal and hit Enter.
git pushYou may be prompted to enter your GitHub credentials. Type in your credentials and hit Enter. The push will be initiated (this may take 30 seconds or so). Eventually you should see something like this:
Counting objects: 6, done.
Delta compression using up to 4 threads.
Compressing objects: 100% (5/5), done.
Writing objects: 100% (6/6), 568 bytes | 568.00 KiB/s, done.
Total 6 (delta 1), reused 0 (delta 0)
remote: Resolving deltas: 100% (1/1), done.
To https://github.com/elfinwood-data-sci/HelloWorld.git
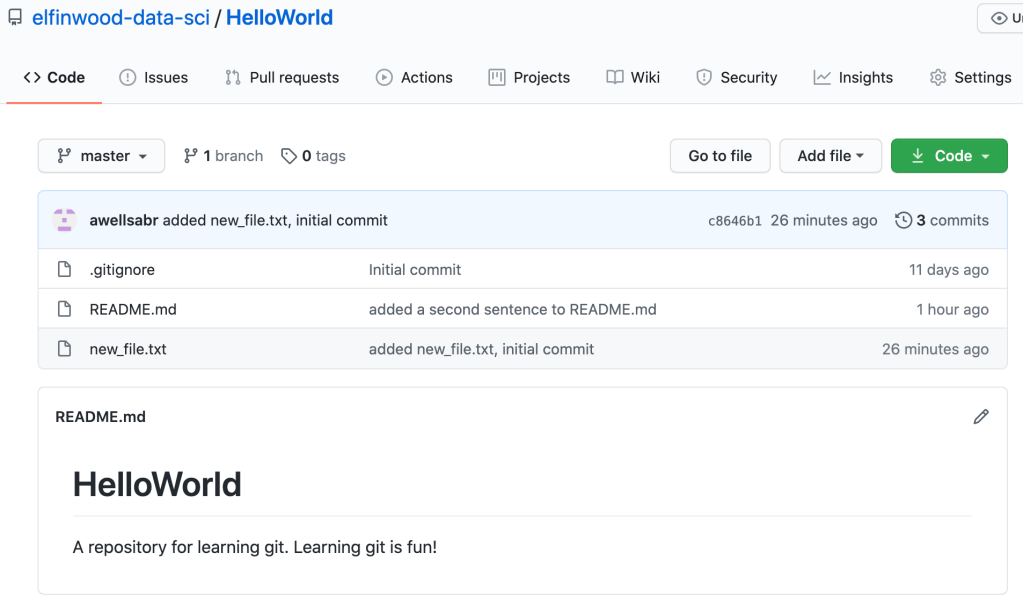
e122fb0..c8646b1 master -> masterThe push was successful. Now go to GitHub and view your HelloWorld repository (you may need to refresh your browser). It should look something like Figure 3. We can see README.md at the bottom of Figure 3 with the second sentence that we added, and that new_file.txt is now present in the remote repository. We can also see our commit messages.
Viewing Differences in GitHub
GitHub provides tools for viewing the differences (“diffs”) between the current version of the file, and the version before a commit. To try this, in GitHub click on the README.md commit message “added a second sentence to README.md” which will take you the page to view the commit details (Figure 4).
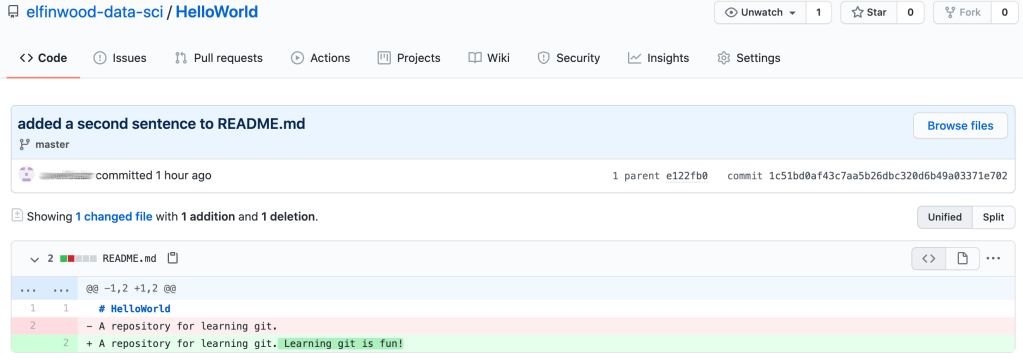
The commit page shows the details of the commit, including the commit hash and message, and the differences between the current version, and version before the last commit. Deletions are in red, and insertions in green.
Pulling
Pulling is the opposite of pushing, and is the process of syncing a local repository with a remote repository (Figure 2). A remote repository can be changed relative to your local repository either by other users of the repository creating new files or changing existing files and pushing them to the repository, or by yourself or others working directly in the remote repository creating new files or editing existing files. When a remote repository is changed the “git pull” command is used to sync the local repository with the remote repository.
To illustrate pulling, we need to first edit a file in the remote repository. Go to the HelloWorld repository in GitHub and the click on the “<> Code” tab. Next, click on new_file.txt. This will open a page showing the details of new_file.txt, with an option to edit the file in GitHub. The page should look something like Figure 5.
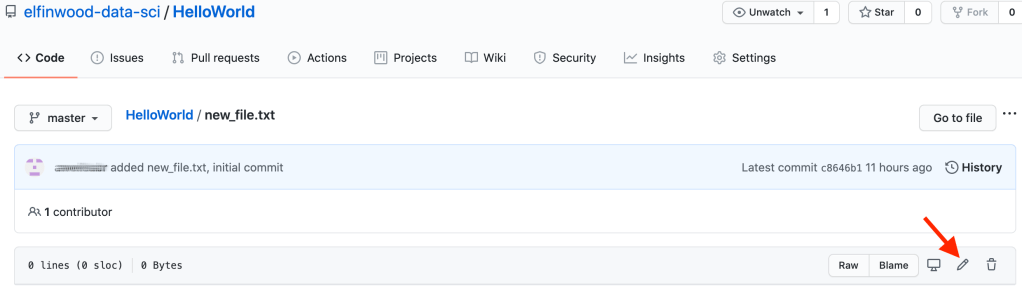
To begin editing the file click on the pencil icon in the lower right corner of the screen (Figure 4, red arrow). Next, type some text into the file. For instance, add a sentence like “This is text I added while editing this file in GitHub.” Now scroll down to the bottom of the page until you see the “Commit Changes” section (Figure 6).
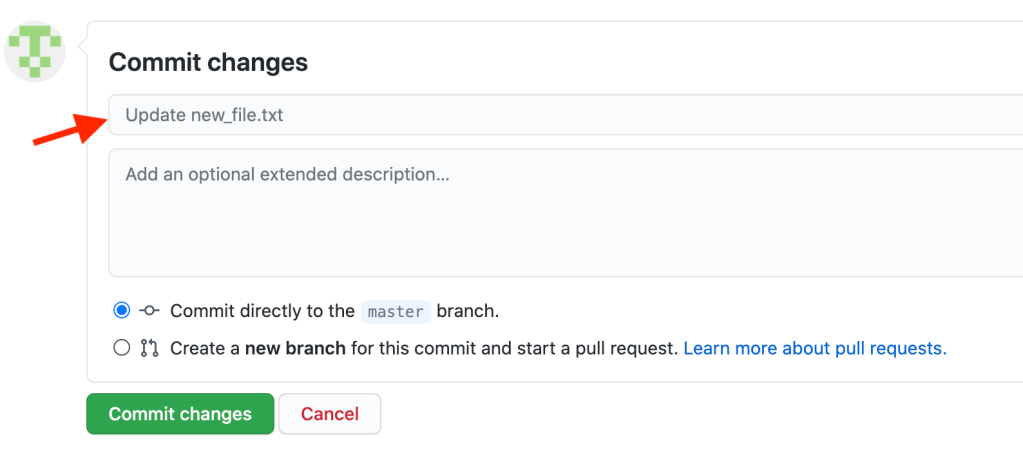
The “Commit changes” section in GitHub is the equivalent of using the “git commit” command in your local git repository. Add a commit message in the text box where it says “Update new_file.txt” (Figure 6, red arrow). For instance, type in “Updated new_file.txt, added a new sentence.” An optional extended description if available if you’d like to add more information about the commit that won’t fit in a short (<50 character) message. You should also see 2 toggle buttons at the bottom, the first one says “Commit directly to the master branch” selected by default. Leave this as is. The second option mentions creating a new branch. I’ll cover branching in the next post on advanced version control topics.
After you’ve entered the commit message click on the green “Commit changes” button. This will commit the change. At this point new_file.txt has been changed in the remote repository and those changes have been committed. Next, we will illustrate pulling the changes from a remote repository into a local repository using the “git pull” command.
Go to the terminal on your computer and type the following:
git pullYou should see something like the following message:
remote: Enumerating objects: 5, done.
remote: Counting objects: 100% (5/5), done.
remote: Compressing objects: 100% (3/3), done.
remote: Total 3 (delta 1), reused 0 (delta 0), pack-reused 0
Unpacking objects: 100% (3/3), done.
From https://github.com/elfinwood-data-sci/HelloWorld
  c8646b1..a6d01fd master -> origin/master
Updating c8646b1..a6d01fd
Fast-forward
  new_file.txt | 1 +
  1 file changed, 1 insertion(+)
Near the bottom of the message we can see the remote repository where the pull originated, the file that was updated, and a little bit about what changed, e.g., “1 insertion (+).” Now open new_file.txt in a text editor. You should see the sentence that you added in GitHub. Nice work, the pull request was successful!
Recommended Reading
As a supplement to this post, I encourage you to read sections 2.2, 2.3, and 2.5 in Pro Git: Everything you need to know about Git.
Next Time on Elfinwood Data Science Blog
In this post I discussed managing files using version control. In the next post, I’ll continue continues the series on version control, and discuss reverting and viewing differences using Git.
If you like this post then please consider subscribing to this blog (see below) or following me on social media. If you’d like to follow this blog, but you don’t want to follow by subscribing through WordPress then a couple of options exist. You can “Like” the Elfinwood Data Science Blog Facebook Page or send me your email using the form on the Contacts Page and I’ll add you to the blog’s email list.
Literature Cited
Chacon S. and B. Straub. 2020. Pro Git: Everything you need to know about Git. Version 2.1.264. Apress. New York, NY. 521 pp. Online here: https://git-scm.com/book/en/v2 (accessed 2020-09-26).
Follow My Blog
Join 5 other subscribers
Copyright © 2020, Aaron Wells

3 thoughts on “Version Control: File Management”