Introduction
In the previous post I provided an overview of version control for managing computer files. In this post, the second in a 5 part series on version control, I’ll be instructing readers on how to get started with version control. Since version control and data management are best learned by doing, the objective of this and future posts is to get readers hands on experience with using version control and managing and analyzing data using PostgreSQL. Future posts will build on this, so if you’re interested in using this blog as a learning tool then please follow along on your personal computer to get started. I’ll provide instructions for both Windows and MacOS.
Getting Started
Below are instructions for quickly getting set up with Git and GitHub and cloning a project. In the examples provided I use GitHub. However, the steps involved are generally the same for other online repositories like GitLab. Chapter 2 “Git Basics” of Pro Git by Chacon and Straub (2020) provides detailed information about getting started with version control.
If you have trouble successfully completing any of the steps outlined below, or notice any errors on this page, please leave a comment on this post, or send me a message on the Contacts page.
The full documentation and other reference materials are available on the Git and GitHub websites at the following links:
Text Editor
A good text editor is invaluable for a data scientist. Basic text editors come with both Windows (Notepad) and Mac OS (TextEdit and Nano). However, there are a number of freely available advanced text editors. For both Mac OS and Windows I recommend Atom. The slick thing about Atom is that it was created by the folks who manage GitHub, and thus it integrates with git and GitHub seamlessly. Atom also provides “packages” to add functionality. For instance, the “teletype” package allows users to share their workspace with collaborators through the internet, and collaborate on code in real time. Think of it as Google Docs for programming. For this and future posts, I’ll use the Atom text editor in the examples that I provide.
Instructions for installing Atom on MacOS and Windows are below:
Another option for Windows users that I recommend is Notepad++. Notepad++ is a powerful, no frills text editor with advanced functionality. For instance, it supports over 80 programming languages, and has a powerful find/replace tool that offers an option to use regular expressions (if you’re into that sort of thing 🙂). If you use Notepad++ and like it, then please consider supporting this free, open source software with a donation. If you really want to get serious about a text editor, and are willing to put in the time to learn, then check out Vim.
Installing Git
To begin you’ll need to install git on your personal computer. To install git go to https://git-scm.com/downloads and then follow the instructions below.
MacOS X
If your running MacOS X you may already have git on your machine. To confirm if you have git already, open a terminal window and type “git –version” and press Enter. If the result is something like “git version 2.14.2” then you already have git.
If not then do the following:
- Go to https://git-scm.com/downloads
- Click on “Mac OS X”
- Follow the instructions on the Download for macOS page.

Windows
Two options for installing git on Windows are provided below. For this and future posts I’ll be showing examples from the command line using Git Bash, so if you want to follow please use option 1 below.
Option 1: Git for Windows
- Go to https://gitforwindows.org/
- Click on “Download” and under assets click on the .exe file for your operating system (e.g., Git-2.28.0-32-bit.exe)
- On your computer double click on the .exe file and follow the instructions.
Option 2: Git SCM
- Go to https://git-scm.com/downloads
- Click on “Windows”, the download should begin automatically.
- Double click on the .exe file that downloaded (it should look something like: Git-2.28.0-32-bit.exe) and follow the instructions that are provided.
- Install one of the many General User Interface (GUI) options.
Setting up GitHub

Next, you’ll create an account on GitHub and create a new repository to use for learning Git.
- Go to https://github.com/
- Either log in if you already have an account, or sign up.
- Click on “Repositories” in the upper middle portion of the screen
- Click on “New” on the far right side of the screen
- Enter “HelloWorld” under Repository Name
- Enter the following description “A repository for learning git.”
- Select Private, and then check the checkbox next to “Add a README file” and “Add .gitignore”
- Select “R” in the .gitignore template dropdown list
- Click “Create Repository”, and voilà you just created your first Git repository
- Your new repository page should look something like Figure 1.
Cloning a Project
Now that you have a remote repository set up, the next step is to copy that repository to your local machine. The process of copying a repository is called “cloning”. Start by creating a folder on your local machine called “learning_data_science”. Save this folder where ever it’s convenient for you. To clone the HelloWorld repository follow the instructions below.

MacOS X
- Open Finder and navigate to the folder above learning_data_science.
- Right click on the learning_data_science folder and then select “New Terminal at Folder”. A terminal window will open.
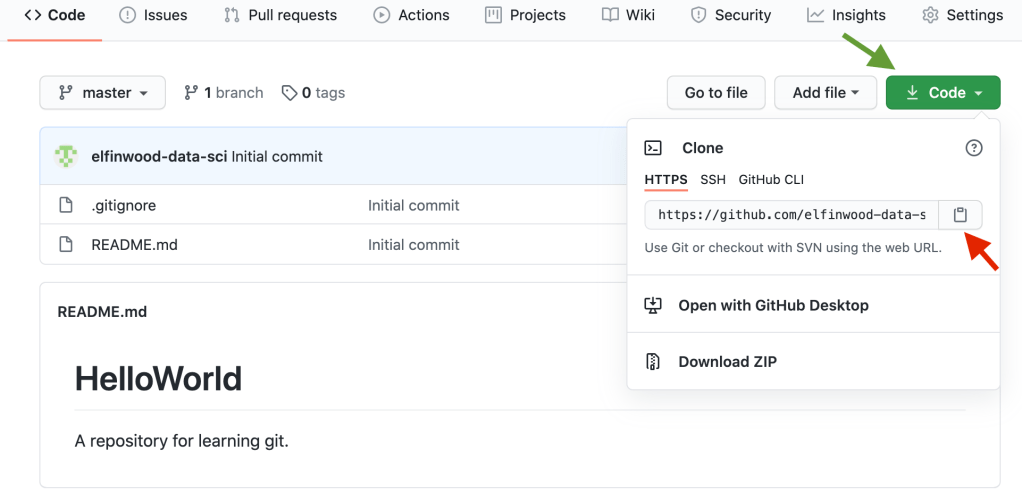
- Go to your HelloWorld repository on GitHub, and on the “<>Code” tab click on the green “Code” button (Figure 2, green arrow). A drop down will appear.
- Click on the copy icon (Figure 2, red arrow) to copy the URL under HTTPS.
- Go back to the terminal and type “git clone”, and then paste in the URL, and then hit enter.
- A local copy of the HelloWorld repository will be cloned into the learning_data_science folder.
Windows
- In Windows Explorer navigate into the learning_data_science folder.
- Right click in the folder, and then click on “Git Bash Here”. A command line interface will open.
- Go to your HelloWorld repository on GitHub, and on the “<>Code” tab click on the green “Code” button (Figure 2, green arrow). A drop down will appear.
- Click on the copy icon (Figure 2, red arrow) to copy the URL under HTTPS.
- In the command line window type “git clone”, and then paste in the URL, and then hit enter (Figure 3).
- A local copy of the HelloWorld repository will be cloned into the learning_data_science folder.
#Cloning a repository in a Mac OS terminal
learning_data_science % git clone https://github.com/elfinwood-data-sci/HelloWorld.git
Initial Git Setup
When you first install Git you need to configure your username and email. Configuring your username and email will allow you to commit changes (covered in the next post) and push those changes (also in the next post) to the remote repository on GitHub (Chacon and Straub 2020). You can do this on via command line in the terminal using the following commands:
git config --global user.name "John Doe"
git config --global user.email johndoe@example.com
If you use the “–global” option then you’ll only need to do this once.
Configuring Credentials using GitBash
If your using GitBash on Windows you can alternatively use GitBash to configure your user name and email and other settings.

Follow the below steps to configure settings in GitBash:
- In Windows Explorer navigate into the learning_data_science folder.
- Right click in the folder, and then click on “Git Extensions” and then on “Setting” (Figure 4). The settings window will open (Figure 5).
- You will likely see some lines of text in red. Click on “Repair” next to “You need to configure a username and email address.” You can ignore the other 2 red lines for now.
- The GitBash settings configuration window will open (Figure 6).
- Enter your GitHub username and the email address you use to log into GitHub next to “User name” and “User email”, respectively (Figure 6, red arrows).
- Click “Apply” and then “OK.” Your credentials are all set up.

Recommended Reading
As a supplement to this post, I encourage you to read sections 1.6 and 2.1 in Pro Git: Everything you need to know about Git.

Next Time on Elfinwood Data Science Blog
In this post I provided a quick start guide to get up and running with version control. In the next post I’ll continue the series on version control, and focus on managing files and versioning using git, including adding, committing, pushing, pulling, and viewing diffs.
If you like this post then please consider subscribing to this blog (see below) or following me on social media. If you’d like to follow this blog, but you don’t want to follow by subscribing through WordPress then a couple of options exist. You can “Like” the Elfinwood Data Science Blog Facebook Page or send me your email using the form on the Contacts Page and I’ll add you to the blog’s email list.
Literature Cited
Chacon S. and B. Straub. 2020. Pro Git: Everything you need to know about Git. Version 2.1.264. Apress. New York, NY. 521 pp. Online here: https://git-scm.com/book/en/v2 (accessed 2020-09-26).
Follow My Blog
Copyright © 2020, Aaron Wells

3 thoughts on “Getting Started with Version Control”